The article will tell you how to easily and simply draw a winter landscape yourself.
Drawings depicting winter landscapes have a special attractive magic: you want to look at them and hang them on the wall in the recreation area (living room, bedroom, office). Images of snow-covered trees and roofs of houses instill in the human soul a feeling of comfort and tenderness, fairy tales and magic that is present during the New Year.
Drawing winter landscapes is not difficult. Main - choose the right paper and paints. Approximately 50% of the success of the entire work depends on the chosen paper. When painting with paints, you will need thick cardboard from the “craft” category. You can also use colored matte cardboard, for example, blue or black, on which white paint, pastels and pencils look especially contrasting.
When thinking about what you can draw in a winter landscape, the first thing that comes to mind is a house. The house has been present in the human mind since childhood, since the child first sees a fairy tale about Morozko or forest animals. It doesn’t matter what kind of house you imagine, the main thing is to draw it correctly.
We invite you to depict a cozy forest house:
- Choose a perspective, i.e. approximate location of the house on a piece of paper.
- It is best if the house is in the center of your image, or close to the center. This way it will attract attention and be the main storyline.
- To draw an even and proportional house with a roof, you can use a ruler, but then be sure to trace the house template by hand so that the drawing does not look angular.
- After you have drawn the main lines: walls, roof, windows, threshold, etc., proceed to detailing.
- Don't rush to draw snow. Only when the house is completely drawn, using white paint or chalk, literally “cover” the house with a “snow cap”. If you only draw with a simple pencil, you will need an eraser.
Step by step drawing:
House in the forest: drawing in stages 
 House, winter landscape: step one “main lines”
  Once the main lines are drawn, sketch out the snow on all surfaces
  Start detailing the drawing, depict nature: trees, fir trees, paths and other little things
 Erase extra lines with an eraser
 Start coloring the picture with paints
How to draw a child in winter with pencil and paints?
You can decorate a drawing with the image of winter with children having fun. Such a drawing will definitely evoke pleasant emotions and associations with childhood. This idea is also good for drawing New Year cards and pictures for competitions and exhibitions.
How to draw:
- Plan the storyline in advance: how your characters will be depicted, where and what they will do: dance, play snowballs, build a snowman, sledding, spinning around a Christmas tree, and so on.
- Schematically depict the figures of children. You must choose a pose for everyone: someone raised their hands up, someone is sitting on a sled, someone has their ears covered or is tickling a friend.
- After you have depicted the figures of the children, you can begin to detail them and create a winter landscape.
How to portray children:

 Children sledding
  Snowball games, snowman
 Winter fun: kids
 Making a snowman, playing snowballs
 Finished drawings:
Drawing with paints: winter fun
 Sledding: painting with paints
 Winter drawing with children having fun
 How to draw animals in winter with pencil and paints?
Winter is a “fairytale time,” which means that even animals at this time of year enjoy the lush snow, wait for the New Year and have fun. You can draw a landscape depicting any “forest inhabitants”: a wolf, a fox, a squirrel, a bear, a hedgehog, a hare and others.
What animals can you draw:
 Step by step drawing of a wolf
  Step by step drawing of a hedgehog
 Step by step drawing of a squirrel
 Step by step drawing of a woodpecker
 Step by step drawing of a moose
  Step by step drawing of a hare
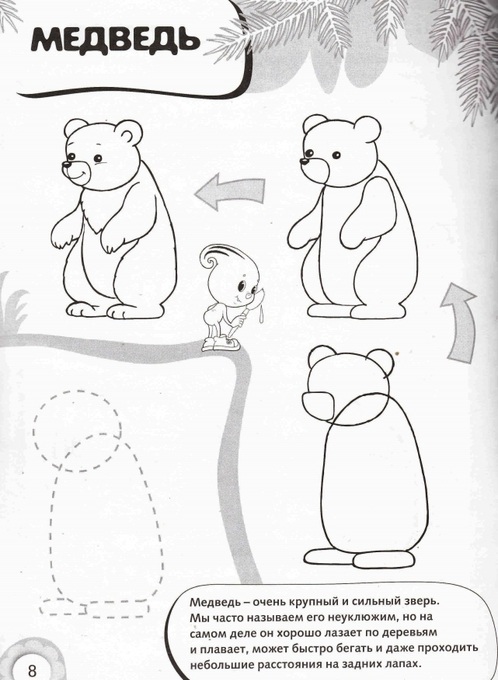 Step by step drawing of a bear
 How to draw a winter landscape with children and animals with pencil and paints?
To make the drawing rich, interesting and positive, depict several story lines at once. For example, in a forest or in a clearing, children have fun with winter fun together.
Drawing Ideas:

 Forest animals, children: “winter” drawing
 Animals: winter fun
  Animals celebrate the New Year
  Children and animals in winter
 New Year's winter drawing Children and animals: winter
 Winter activities for animals Feeding animals in winter
 Drawings about winter with children and animals for beginners and children for sketching: photos
If you are not good at drawing on your own, sketching will always help you. You can draw the template through glass or by placing a sheet of white paper on your computer monitor (it is advisable to do this in the dark). Adjust the size and location of the picture yourself.
Marina Yakurina
i]Dear colleagues, good day everyone. I just recently met " Master– a class for educators, children’s art schools teachers, primary school teachers « Winter landscape. Morning". on the website of the Educational and Methodological Office. I really liked the idea. I also decided to draw with my kids. Moreover, the idea is close in spirit to right-brain drawing, which I was very inspired by. I advise everyone who is not familiar with this technique to watch it. So, my MK.
Target:
Introducing new drawing techniques.
Training on how to work on a large format (A3).
Continued work to consolidate the concept of perspective.
Material
A3 format, palette, white gouache, blue, scarlet, burgundy, purple and yellow colors. Round and flat bristle brushes (№ 1-5) .
1. Mark the horizon line on a piece of paper.
2. Prime the entire sheet with white gouache. It is advisable to do this very quickly (with the widest brush possible so that the paint does not have time to dry.


3. On the part below the horizon line we put drops of blue and maybe purple or lilac (at your discretion - creativity is welcome)

4. And quickly, quickly, stretch these points with horizontal strokes across the entire sheet


5. Move to the top of the sheet - we will draw what is above the horizon line. We put several yellow dots in the center, then red, burgundy, blue, purple in the shape of a semicircle.

6. And again, quickly, quickly, using semicircular strokes, stretch the paint; you can add a little water to the brush if the white primer has dried out. Do not brush over one area many times.

It can be done simpler

7. Drawing tree trunks. Blue gouache(straight from the jar)draw tree trunks. We try to draw not a fence of identical verticals, but trunks of different thicknesses. We place them scattered - sometimes closer, sometimes further from each other, but approximately on the horizon line.

8. Let's draw now pine branches. They are located high above the ground, do not reach towards the sky and do not fall towards the ground, but are located almost horizontally.


9. Now we begin to draw the most interesting thing - the image of falling shadows. We find on drawing trees standing in the middle. From one of them the shadow will shift slightly to the right, from the other - slightly to the left. These trees will become landmarks.


Let's draw blue shadows (mix white with blue and find a suitable shade). Same color draw small Christmas trees are poked with a semi-dry brush, depicting approximately a triangle with the crown slightly elongated.

We put up Christmas trees randomly.
10. In the same way draw needles on branches


11. Lightly tint the snow on the horizon line with pale yellow.

Today's MK was made by my 6-year-old pupil Spirina Dasha, a wonderful little artist. We performed several more works using the same technique. Next time, perhaps, we'll tell you how we drew them. Or maybe it won’t be necessary anymore, because the principle is clear.


Publications on the topic:
"Winter in shades of purple." Master class on painting with gouache for children aged 6-8 years
We draw a boletus with gouache step by step. Master class for everyone who wants to learn how to draw a boletus mushroom in gouache. The purpose of the master class: learn to draw.
Life flies by instantly, And we live as if we were writing a draft, Not understanding in the scandalous bustle, That our life is just that.
Bewitched by the Enchantress of Winter, the forest stands, And under the snowy fringe, motionless, mute, it glitters with a wonderful life. F. Tyutchev In the Moscow region.
Master class Drawing with gouache on glass along the contour. Step by step instructions:
Winter is a “magical” time, which children and adults associate with fairy tales, gifts, holidays and fun. Drawing winter is not only easy, but also fun. Every time you depict a new storyline (a snow-covered house in the forest, a squirrel on a Christmas tree or falling snowflakes), you immerse yourself in the world of your drawing and partially dissolve in it.
You can draw a winter landscape with anything: pencils, crayons, paints. The simplest tool is, of course, a pencil. Choose colored or simple pencils, as well as thick landscape or craft paper.
IMPORTANT: Drawing a winter landscape on colored craft paper is much more pleasant and interesting, since this material already has a certain color shade, onto which white color fits easily and in contrast.
Before drawing, plan in advance what exactly you will depict: a hut, a snow-covered city, a snow-covered forest or a playground. First, sketch out your landscape (mountains, houses, figures) and only then start detailing, depicting lumps of snow on every surface.
You can draw snow in waves (imagine that there is a small cloud on each branch or roof), or dotted. To do this, you should use a white pencil, with which you will make many dot marks in the selected location.
IMPORTANT: When working, always use a good quality eraser, which will help remove unnecessary lines and sketches and make the drawing neat and “clean”.
How to draw a winter landscape and the beauty of Russian winter with pencil, paints, and gouache?
“The beauty of the Russian winter” is snow-covered fields and forests, warm, cozy huts with “snow caps” on the roofs, children playing with snowballs in the yard, kind forest animals and only happy faces. Drawings depicting Russian winter should radiate warmth and only positive emotions.
When depicting the “Russian winter”, remember everything that you associate with the “good old winter fairy tale”: sleighs, grandmother’s rolls, a fluffy Christmas tree, Santa Claus, red-cheeked children, skates and much more. You should draw the entire sketch with a pencil and only then paint it with bright colors, not sparing the colors.
Russian winter, drawing ideas:
Russian winter: simple template  Russian winter: drawing template
  Russian winter and winter fun: template for drawing
  Russian winter, hut: template for drawing
  Russian snowy winter: drawing template
  Hut in the forest, Russian winter: template for drawing
“Russian Winter”, finished drawings:
Russian winter, children's fun: drawing Russian winter in the village: drawing
  Russian winter, Santa Claus: drawing
  Russian winter, Christmas time: drawing
  Russian winter, morning: drawing Russian winter, huts: drawing
 How to draw the beginning of winter with a pencil?
The beginning of winter means not snowdrifts and snowmen, but roofs of houses and tree branches slightly covered with a white veil. There is a special magic in the first days of the “fairy tale time” and therefore you can try to capture it in pictures and drawings.
You can choose any subject for drawing: nature, city, village. The main thing is to try to convey the coldness of the frosty air and the mood. The sky deserves special attention. To depict it, use heavy blue paints so that the ground looks contrasting, and the first snow especially stands out.
IMPORTANT: It wouldn’t hurt to also depict the wind and the first snowflakes descending to the ground. They can be large or small, detailed or just white dots.
The beginning of winter, how to draw:
 The picture clearly shows the gold of recent autumn and the first snow that fell
  You can depict “bare” trees and yellow fields, only covered with the first snow. The first snow is often associated with the joy of children.
  You can depict the beginning of winter not necessarily through a landscape, but also as a view from a window
  The beginning of winter is often associated with bare trees, wet puddles and fallen leaves.
  A simple children's drawing of the first snow is very simple, but conveys all the energy of real winter.
  You can depict a winter landscape, both rural and urban.
  First snow: gouache drawing
 How to draw a winter forest with pencil and gouache?
The winter forest becomes especially charming and beautiful when the first snow comes. You can depict any trees, complement them with fir trees, bushes and clearings. The main thing is to cover all the branches and crowns in the forest with a white veil and snow “caps”.
Depending on what exactly you want to depict, you can complement the picture with snow-capped mountains, forest animals, a village with glowing windows in the distance, a bright moon, stars or a month. If you draw with a pencil, choose dark paper, on which a white pencil will look more contrasting.
IMPORTANT: Drawing a winter landscape with gouache is much easier. To do this, apply paint layer by layer: first the background, then the forest, and only when everything dries - white snow.
Drawing a winter forest with gouache:
Winter forest gouache on white paper Winter forest gouache on blue paper
  Winter forest gouache, multi-layer drawing
  Winter forest with a simple pencil, winter
  Winter forest with colored pencils: children's drawing
  Winter forest, hut: paints, pencil
 How to draw a winter village with pencil and gouache?
The images of a winter Russian village, dusted with snow, where light and comfort glow in every house, are truly captivating. It is best to draw such images on dark paper or with a dark background so that the snow looks especially contrasting.
IMPORTANT: The drawing where you depict evening or early morning will turn out bright and effective. In the evening or at night it is good to draw the stars and the moon, in the morning - a bright red sunrise and sparkling snow.
Ideas for drawings:
 Night, winter village: colors
  Winter in the village: colors Winter morning in the village: colors
  Early morning in a village in winter: colors
  Winter in the countryside: a simple pencil
  Country winter: pencil
  Winter, village: pencil
 Ideas for drawings on the theme of winter for sketching
If you do not have special drawing skills, templates for sketching will always help you. With the help of templates you can depict any landscape and picture in your head. You can sketch by observing every detail of the image, or by attaching the drawing to the glass (now everything is much simpler in the era of computers and a sheet of paper can simply be placed on the computer monitor to trace the outline with a pencil).
 Template for drawing No. 1
  Template for drawing No. 2
  Template for drawing No. 3
  Template for drawing No. 4
  Template for drawing No. 5
 Our winter is so severe that soon pedestrian crossings will be made under the snow, and cars clearly need anti-gravity gadgets to fly above the snow level. I'll tell you how to draw winter with a pencil. So many holidays and fun, first Santa Claus with his big red hat will visit us, and his eternal girlfriend the Snow Maiden will also not disappear anywhere, she will come running covered in snow, late, as always. And we’ll just go outside, look at the snow, throw snowballs, and wake up next to an unknown snow woman. Then we’ll go home, and there the whole table will already be set, the Christmas tree sparkles with a rainbow, whoever has a fireplace in the house is completely lucky. There is no better time to gather with family or friends in the cozy warmth, dream about summer, and remember the old days. Let's try to draw one of the beautiful landscapes that can be seen in winter.
How to draw winter with a pencil step by step
Step one. Let's draw a long path going beyond the horizon, right above it is a small but noticeable moon, and draw a horizontal line of the mountains.  Step two. Let's create a small winter town. We need several houses with sharp roofs, several trees and, in the very center, their leader - a decorated and shiny Christmas tree.
  Step three. Let's shade the entire mountainous area in the background, as well as the walls of the houses and the trunk of each tree. In addition, we will add a small snowman on the right side.
  Step four. Now the picture needs more vibrancy. Let's shade out the houses and mountains more closely, draw lines on the path, take a closer look at each noticeable tree, and draw a small fence around the snowman.
  Step five. Don't forget the moon. We turn it into a small luminous ball in the heavens, and also finish up with things on earth. And let's draw another large tree sticking out in the upper right corner.
  However, there are an endless variety of topics for drawing winter landscapes. For it is enough just to go outside and see the picture created for us by nature. Stay safe and have a great winter, don't forget about DayFun and keep drawing. Leave your wishes on the comments page, I will always be glad to see you. Come back often. A few more interesting lessons especially for you.
Gouache drawing lesson. This lesson is dedicated to the winter season and is called how to paint winter with gouache paints step by step. Winter is a harsh time of year, but also a beautiful one. Very beautiful landscapes of white steppes, trees with white crowns, and when the snow falls it becomes fun and you want to frolic. Then you come home, it’s warm, you drink hot tea and it’s also great, because there is a place where they are waiting for you and you can warm up. These days you understand all the beauty and all the severity of nature, then you get tired of it all and want summer, bask in the sun, swim in the sea.
We will draw winter at night, when the sun has set below the horizon, it has gotten dark, but the moon is shining and something is visible, the lights are on in the house, the water in the lake is frozen, the tree is covered in snow, there are stars in the sky.
First, you need to make a preliminary pencil sketch on a piece of paper. It is better to take an A3 sheet, that is, like two landscape sheets together. You can add your own details to this drawing if it seems incomplete to you.

You don’t have to carefully draw out the details, just try to maintain the balance of the composition on a sheet of paper. Using a large brush (it is better to use a bristle brush) we will draw the sky. It is necessary to ensure that the transition is fairly even and smooth. At the top - mix dark blue paint with black (mix first on the palette), then smoothly move to blue and gradually introduce white paint. You can see all this in the picture.

Now let's slowly get to the house. Our house is located quite close to us, so let’s draw it in more detail. I suggest drawing the house a little exaggeratedly, cartoonishly or something, so it’s easier to practice working with strokes.
We'll need ocher first. This is approximately halfway between brown and yellow paint. If you don’t have such paint, mix yellow, brown and a little white paint on the palette. Make a few strokes along the logs of the house.

Then at the bottom of the log, make a few more short strokes of brown paint. Do not wait for the ocher to dry - apply directly to the wet paint. Just don't use too much water - the paint shouldn't be liquid - it's not watercolor.

This is how we achieved halftones. Now, by mixing black and brown, we will enhance the shadow at the bottom of the log. Apply paint in short, small strokes.

Thus, you need to draw all the logs that make up the house - a light top and a dark bottom.

The upper part of the house, where the attic window is located, is painted over with vertical strokes. Try to apply strokes at a time, without smearing, so as not to disturb the texture of the wood.

There is still a long way to go before the house is completed. Now let's move on to the window. Since it is night outside, the lights are on in the house. Let's try to draw it now. For this we need yellow, brown and white paint. Draw a yellow stripe around the perimeter of the window.

Now let's add white paint to the middle. Do not take it too liquid - the paint should be thick enough. Gently blend the edges to create a smooth transition. Apply a little brown paint along the edges of the window, also smoothly mixing it with the yellow. Draw a frame around the perimeter of the window. And in the middle, do not bring a little to a white spot - as if the light is blurring the outlines of the frame.

When the window is ready, you can paint the shutters and trim. It's up to your taste. Place some snow on the outside windowsill and between the logs. The end circles of the logs must also be drawn according to their shape. Apply strokes in a circle, first with ocher, then define the annual rings with a darker color, brown, and highlight the shadow below with black (mix it with brown so as not to look aggressive).
First paint over the snow on the roof with white gouache, then mix blue, black and white on your palette. Try to get a light blue-gray color. Use this color to draw a shadow at the bottom of the snow. Don't wait for the paint to dry - the colors should lie on top of each other and blend.

We have painted the sky, now we need to draw the distant forest. First, mixing black and white (you need to get a color just a little darker than the sky), draw with vertical strokes the outlines of trees that are not visible at night from a great distance. Then, adding a little dark blue to the mixed paint, a little lower we will draw another silhouette of the trees - they will be closer to our house.

Draw the foreground, forming a frozen lake. The lake itself can be drawn in the same way as the sky, only upside down. That is, the colors should be mixed in the reverse order. Please note that the snow is not painted over with an even white color. Try to form snowdrifts. This must be done with the help of a shadow. The figure shows how this can be done.

On the left we left space to draw a Christmas tree covered with snow. We have already discussed how to simply draw a Christmas tree here. Now you can simply draw the outline of the tree with a few strokes. Many colors are lost in the dark, so just paint with dark green paint. You can add a little blue to it.

Place snow on the feet of the tree. You can darken the bottom edge of the snow a little, but it’s not necessary. Take a large, hard brush, pick up some paint on it so that the brush is semi-dry (do not dip it in a jar of water before adding paint) and add the snow on the ice.
We forgot to draw a stove heating pipe at the house! What a house without a stove in winter. Mix brown, black and white paint and paint a pipe, draw lines with a thin brush to represent the bricks, Draw smoke coming from the pipe.
In the background, use a thin brush to draw silhouettes of trees.
The picture can be improved endlessly. You can draw stars in the sky, put a picket fence around the house, etc. But sometimes it’s better to stop in time so as not to ruin the work.


