In various specialized institutions (art schools, for example) It is recommended to study the complete structure of the head– from muscles to hair – so that you can draw it correctly. But there is one little secret here: even if by some miracle you manage to learn on your own absolutely all the terms that are at least indirectly related to the structure of the head, you still will not be able to draw the head as it should be. And all because such institutions have a large number of guards at their disposal. (teachers, I mean) who correct and guide students during work.
Our task (before learning)- on one's own (without teachers nearby) learn to coordinate your actions, understand the very essence of the drawing process, be able to see your mistakes and correct them correctly. That is why we will go a little beyond the standard familiar system and begin to formulate points of a kind of instruction that will help us solve our problem:
- First, we need to understand the process of creating a head on paper
- Next - the easiest thing at first glance - just draw.
- And finally, learn how to draw a head correctly without unnecessary stress, understand the essence of this process and be able to eliminate your mistakes
Well, dear amateur draftsmen, are you ready? Are you ready for work? Then go ahead and sing (it’s advisable to hum it mentally, there’s no point in alarming the neighbors!)
To get started, we, as always, you need to find everything you might need. In this case, it's , charcoal, A2 paper, nature, chair (or a paper clip - it depends on your nature of envy...). For nature, we catch a restless and trusted friend, or we convince the grandmother with her knitting to move to your stool, or we ask the grandfather to tell about something interesting (we are working in the process, of course). If you have diligent brothers and sisters, you can place them too. But you shouldn’t start drawing a head by drawing the head of your favorite parrot...
As a last resort (well, very extreme - if there is absolutely no way out and there is not a single living soul nearby) you can use a ready-made reproduction or a photo (which we attach to the easel in the upper left corner). Is everything there? Is there any nature? Let's continue, or rather, start drawing.
First sketches of the head
First of all, we make constructive ones with charcoal - and even if it doesn’t turn out very neatly, don’t worry, these are just sketches:
- We are looking for the basic ratios of the proportions of height and width - for this we compose the shoulders, neck and head on paper. Ours is working hard here.
- Now we need to find the volumes of what we have assembled separately (head, neck, shoulder girdle)
- Do you remember how at the very beginning, when you were still unintelligent novice draftsmen, you worked hard to draw cylinders, etc.? So, look at your nature and understand that this is not a head, but just one of the varieties of form. Right now we must realize and perceive that the head is an inanimate object, then it will be easier to draw.
The next step would be observing your nature and sketching this very volume of the head. You shouldn’t immediately draw tiny wrinkles, bristles and eyelashes - it’s better to pay attention to the fact that we are drawing a three-dimensional image, not a flat one. It follows from this that we need to feel the volume of the head, feel all the protruding parts of the face and head in general.

Draw, stop wasting time reading my scribbles - pencils in your teeth and go ahead, you must understand the very essence of the process. And as you understand, I will still be here.

In order to draw a head with a pencil, we need to hold on to something. These can be points that, if you look, are immediately visible - they mean the most protruding places in the head area. Further you need to select the main planes– they are formed using various kinks in shape.
The most prominent points and, accordingly, planes make up the structure of the volume of the head - these are constructive moments. The cheekbones stand out most clearly to our eyes, (or a nasal prism - after all, the nose is shaped like a prism), forehead, chin, balls in the eye sockets.
To find the height of the head, we simply need to find the highest point on the skull and the lowest, most protruding point on the chin.
Now it is important to distribute the main light and shade. To do this, you need to squint your eyes and look at the nature, then you will be able to distribute the basic light and shade along the planes of the head. By the way, if you are good at distributing shadows along the edges of the simplest geometric shapes, then I’ll tell you a secret that the head can easily fit into a cube, so... And act according to the same system of distributing light and shadow.
The main thing you need to understand at this stage of work is that head - the same shape in which there are such characteristics as depth and width plus planes and edges (as in a cube). That is, all the same patterns apply to it as before (I hope you remember, there was talk about active and inactive, distant and close).
Let's move on to the next point. One of the previous paragraphs talked about the mysterious design points that determine the shape of the head. It is these points that give us the proportional relationships of the planes on the volume of the head. If you have realized the importance of these points, then with due reverence and trepidation we begin to examine, analyze and distribute them.

- The first thing that immediately strikes us is, of course, the orbital sockets and eye sockets.
- The second thing we immediately pay attention to is the zygomatic point on the left and right.
- Now it’s the turn of the frontal tubercles.
- Chin (or rather, the point of the chin).
- Angle of the lower jaw.
- Now one of the most important is the highest point on the skull of our nature.
- Finally, the temporal points.
- The parietal tubercles are the most convex, according to textbooks, along the width of the bone, which are located on the back of the head.
Well, that’s all for starters with the dots - you need to draw them and remember them well, otherwise you will have to repeat this material again. Now look again at the picture above, see? In addition to dots, there are also colored lines.
Are you wondering what they mean and what to call them? Patience, my dears, now we will analyze them too.
These lines are called axes, which, quite logically, schematically divide the human head into different specific areas. In the next picture, there are already more "humanized", rather than a bone, we can consider both our points and axes.

- The first line is red - it divides the head into two equal halves, in other words, this is the axis of symmetry.
- The line of the superciliary arches, which divides the head into the upper cranial and lower facial regions, is highlighted in blue.
- The green line is the one that divides the head into the facial and occipital regions and it passes exactly through the highest point of the skull and through the ears.
- The yellow line is usually used to determine the rotation of the head (you understand, this is very important for the drawing), that is, this is the axis of three-quarter rotation.
- The neck cylinder on which the head is mounted.
- And one more axis, it is turquoise in color, which runs through the lower points of the ears and the lower line of the nose. It shows the lower part of the nasal prism.
BUT! All this is given to you, beginning draftsmen, solely for information purposes and so that you better understand the structure of the head. And we will learn to draw using an easier version of what was described above - these are blanks. So this means: front, side and three-quarter views.

These rectangular blanks have everything we need: axes, points, proportional relationships of different areas of the head and, in fact, the most important thing - the structure. That is, as an example of proportional relationships, the height from the level of the eyebrows to the level of the lower line of the nose is equal to the height of the ear, or the mouth and the lower corner of the jaw are located on the same line. But here we can also apply: that part of the face that is closer to us retains its original sizes and shapes, and that part that is further away (in a turn, for example) there won't be much (a little, dear artists, a little, and not as always...) distort in size, become smaller.
Consolidating the result
Now the finale: consolidate what we just read. To do this, we will need to work together with the blank. Now our main assistant in drawing is a blank, it’s like a template, a kind of prototype of a real head. It's much easier to learn.
You are already drawing a person’s head, that is, the composition has been outlined, the place for the head, and the main volumes too.
The second step will be to find the proportional relationships of the head, its shape and character. This will be the sketch of the base of the head, our simple blank.
Now the vertical axis - my hands are itching to divide my head into equal areas (well, not necessarily equal - it depends on all sorts of turns and angles). This axis is determined by the location of the nose and gives us two important points: the highest and the lowest.
Since we also determine the rotation of the head, then need to find the three-quarter turn line– it would be very useful for us. To do this, visually find the location of the zygomatic bone and draw a line through the zygomatic point. We'll deal with it later, so for now it's enough to just outline it lightly.
Now it’s time for the brow line. Here we just need to use our eye and determine how much space is occupied by the forehead and hair, and how much is the face up to the chin. Woo-a-la! Ready.

Now you need to select the line of the lower pyramid of the nose. To do this, it is better to use this pattern: the line of the brow ridges and the line of the lower prism of the nose divide the head into equal parts. But at the same time, you also need to take into account the features of the head being drawn.
The next stage is searching for the line dividing the head into the occipital and front parts. We already remember that it passes through the ear opening and the highest point. Now take a closer look: at the intersection of the three-quarter turn line and the previous line there is the temporal point that we outlined earlier. If you can’t yet see the shape of your head, then correct all the lines using your eye.
 Well, we already have enough points and lines to start marking the nose, the place for which has already been cleared and found.
The same thing with the ear - and there is a place for it (it would be strange if this place didn’t exist, you’ll agree). Its height is equal to the distance between the line of the superciliary arches and the line of the lower prism of the nose, and it itself passes through the line dividing the head into the front and back of the head. Better look at the picture on the right, I think it’s clearer than all these twisted phrases.
There is very little left...
The next stage is the search for zygomatic points, but since they are sandwiched, one might say, in the lines, it will not be difficult to find them. And the corner of the lower jaw - it is located at the intersection (again at the intersection) of the line of the mouth and the line dividing the head into the back and front (you understand what I mean). Well, now even a hedgehog can find his mouth 🙂
It remains to find a little and among this "A little" place for eyes, brow ridges (places that especially protrude on the eyebrows - I decipher them). And now it's time to look for the frontal tuberosities (that is, protruding points on the forehead). Finding them is no less simple; you just need to draw lines from the brow ridge to the most convex points of the forehead. Ta-da! You already have frontal bumps. But in order to understand them better, you need to tie these points to the highest point and to the temporal ones.
Finally, if the angle allows us to see the parietal tubercle - the most convex part on the back of the head.
Now spin the blanks, use the lines and points that you remember. For example, something like this:

Review again what we have already covered here and rotate the blanks, taking into account all the design details. To begin with, it would be good if you get blanks in three familiar positions: profile, front and three-quarter.

Have you played enough? Are you ready for some scary serious work? Catch your nature and return it to its place. Now we will gradually transfer what we learned on blanks to our long-suffering nature. Look at it with new eyes. Examine the head from all angles and try to evaluate it as an inanimate object, to understand its “structure”... Abstract from the person of the head’s bearer.
The next task is simple transfer all previously studied structural axes and points to an already living one, quite curious, asking questions like “And how? Looks like it worked out?". Of course not literally - visually (I'm afraid your nature won't be funny at all if you draw on her head and face with multi-colored pencils).


Now that you're on a diligent search, I'll tell you something about proportions. The ideal proportions are considered to be the so-called “Greek” proportions. for it was the inhabitants of Ancient Greece who identified the ideal proportions of the body. But the ideal proportions are somewhat different from those that each person has - it is these discrepancies that allow people to maintain their individuality.
You can check the correctness of the proportions by connecting all the most important parts of the face or constructive points located one opposite the other - their connection will pass through the ear hole.
Practice
Now the practical part - we transfer our knowledge to life drawing:

- So, we are working on the composition, finding a place for the head, neck, and shoulders. We work according to the principle: the indent from the edge of the paper (tablet) in front of the front part (front!) is greater than above the back of the head, and at the top the indent is less than at the bottom.
- Now we find a place separately for each subject of the composition: the neck, shoulder girdle and, accordingly, the head.
- Remember our blank? Now we draw a blank, but taking into account all the proportional features of our nature. Do not forget that our neck is not just a strange rectangle, it is a cylinder - that is, it is voluminous, as are the shoulders.
- The blank is already in place, now we work with it using the following sub-points:
a) Find the lowest and highest points using the axis dividing the head into two equal parts.
b) Three-quarter turn line – remember this one? Because it passes through the zygomatic point (of course you haven't forgotten that yet!), then we will have to first find this very point and mark it.
c) Further along the plan is the line of the brow arches. It can be carried out at the level of the eyebrows (a little further) and plus one more detail, which we will arbitrarily call the break point of the brow ridges. This point is located exactly where the eyebrows change their direction.
d) Now it’s time for the bottom line of the nose prism. We carry it out as in the case of the brow ridges, at the level of the nose, only further. Unfocus your gaze on your nature, do not look specifically at it. And try not to change the angle of your observation.
e) The temporal point, which is quite clearly visible in our nature. There are as many as three points located on the same line (temporal, high and ear opening) and it fits the shape of the head.
f) Ears and nose. The height of the ear has already been found using lines, but we take the shape from our nature. The nose is a little more difficult. You need to outline the total volume of the nose schematically with a pyramid and then deal with the features there. But! Not a single form in our nature lives on its own; it passes, crawls and flows into something else. Smoothness, comrades, and plasticity, remember this - the nose, for example, connects to the brow ridges.
g) We complete the search for zygomatic points (yes, it lasted all this time!).
h) We determine the place for the mouth and find the angle of the lower jaw based on the shape.
i) Finally, we find a line for the eyes, which goes somewhere along the corners of the eyes. For them to be drawn correctly, there must be enough space between the eyes for one more (it is not necessary to draw the third eye, but it is better not to draw it at all).
j) And now we come to the frontal tubercles. They are found using lines that you draw from the brow ridges to the most convex areas of a person’s forehead - these lines are located symmetrically to the central axis. And from them we draw lines to the temple points and to the highest point. Hurray for us!
I think the question is "How to draw a head" was at least a little revealed for you, thank you for being with us!
In order to learn how to draw a human head with a pencil, you need to learn the necessary proportions.
Male head: determining proportions
Using a grid to correctly construct the head and clarify proportions is especially useful for beginners. Despite the variety of faces, basic proportions apply to almost any race.
Full-face head - 5 cells horizontally by 7 cells vertically. Central vertical line of symmetry.
Horizontal scale
1. The width of the eye is 1/5 of the entire width of the head and equals 1 square.
2. The distance between the eyes is 1 cell
3. The distance from the edge of the head to the outer corner of the eye is 1 square.
4.The width of the eye is 1 square
5. The distance from the outer corner of the right eye to the outline of the face is 1 cell.
6. The nose, as well as the line of the base of the chin, fits into one central cell vertically
Vertical scale: full face
1.Eyes: located in the middle of the entire height of the head.
2. Hairline: 1 cell from the top border of the head.
3.Nose: 1.5 cells down from eye level.
4.Border of the lower lip: 1 cell up from the bottom point of the chin
5. Ears: from the tip of the nose to the eyebrows - 2 squares.
Horizontal scale: profile
1. Head in profile: length 7 cells and width 7 cells
2. The distance between the anterior border of the eye and the tip of the nose is 1 cell.
3. The ear width is 1 square. Its frontal part is located 5 cells further from the tip of the nose and 2 cells from the border of the head.
4. The nose protrudes half a cell from the main shape of the skull, the size of which is approximately 6.5 cells.
Women's proportions are the same as men's.


Drawing the head and facial features - exercises

Profile view:
The nose protrudes more than other facial features
The jaw protrudes no more than the forehead
The ear is located significantly further than the midline of the profile
In this angle the mouth line is quite short
Study the shape of the eye
Three-quarter view
The far eye has a shortened shape compared to the near one, because we do not see its inner corner.
The far half of the mouth is shorter than the near one
The same observations apply to eyebrows.
Front view
The eyes are located relative to each other at a distance of the length of one eye.
One side of the head is a mirror image of the other.
The widest part of the head is above the ears.
The widest part of the face is at the level of the cheekbones.
With this angle, the shape of the ears is less expressive.
Facial features "close-up"

1.Profile view
The eyelids should be slightly larger than the eyeball - otherwise the eye would not be able to close.
2. Three-quarter view
Note the significant difference in shapes. The shape of the far eye resembles a profile view, while the near one appears more complete due to the fact that the inner corner is clearly visible. The far brow arch appears shorter than the near one.
3.Front view
In this type, the eyes are a mirror image of each other. The distance between them is equal to the length of one eye. Please note that, as a rule, approximately 1/8 or ¼ of the iris is hidden under the upper eyelid, and the lower border of the iris almost touches the lower eyelid.

From different angles, the nose has different shapes.
1. Profile view
Pay attention to the shape of the nostril and determine its distance in relation to the tip of the nose.
2. Three-quarter view.
The profile outline of the nose remains evident; however, notice how the distance from the nostril to the tip of the nose changes.
3.Front view
Only the length of the nose and its tip are expressed here. The nostrils are also outlined and accentuated - don't forget to work out the tonal relationships.
1.Profile view
In this angle, the line of lip closure is the shortest.
2. Three-quarter view
The side of the lips closest to us resembles a full-face view of the mouth, while the distant side appears shortened due to perspective contraction.
3.Front view
We are very familiar with this particular perspective. It is very important to accurately and correctly draw the line where the lips close, otherwise you will not achieve an accurate reproduction of the shape of the mouth.
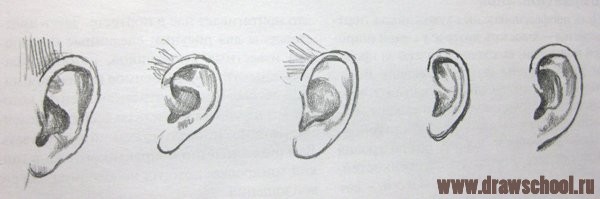
Ears - There are different configurations, just a few are shown here.
Determination of facial features.
Eyes are of paramount importance because very often they are what define a person's facial expression and make it so recognizable to us. The next most important elements are the mouth and nose.

The line where the lips close is strictly straight.
Smile: upward curve of the line.
Sadness: bending the line down
Are your lips thin or full?
Are your eyelids narrow or wide?
Eyebrow arches - curved or straight?

Proportions without a grid

1. Eye level.
2. Central axis and eye level line at right angles to the central axis.
3. The tip of the nose is a little closer to the eyes, at a distance slightly greater than a third, but less than half.
4.Central line of the mouth. Approximately one third of the distance from the tip of the nose to the chin.
5. The distance between the eyes is equal to the width of one eye.
6.Dropping straight lines from the inner corners of the eyes they will come into contact with the edges of the nostrils.
7. By lowering straight lines from the center of the eye pupils, they will come into contact with the outer corners of the mouth.
8. Move the pencil along a horizontal line at eye level to determine the upper tips of the ears.
9. By drawing a line from the lower tips of the ears, you will find yourself in the space between the nose and mouth. Ears are bigger than you think.
10.Neck width.
The distance from eye level to the chin is equal to the distance from the outer corner of the eye to the back edge of the ear.
Exercises
Well, now let's try to draw a portrait based on the knowledge we have acquired. First, let's make a portrait of a woman - ladies after all)
First, outline the general shape of the head and make sure that it relates correctly to the shape of the neck. The shape of the head can be round, elongated and narrowed. But whatever it is, you must define it at the very beginning of your work.

Visualize and decide how the hair covers the head and how it relates to its overall shape. Just indicate their position.

Now mark the basic shape of the head, starting from the eye line. Their level and size must be adjusted, as well as the location of the eyebrows.

Then proceed to sketch out the general shape of the nose determined by its angle and the degree of protrusion relative to the overall surface of the face.
Determine the length and width of the mouth, make sure that you position it correctly in relation to the chin.
At this stage, draw out the shape of the head and facial features more clearly. Then select a tonal range and outline the shadow areas.

Now work on the chiaroscuro of the face, based on the position of the head relative to the light source and the selected angle. When working, pay attention to the smooth transition of dark values into light ones. Finally, highlight the eyes.
Your portrait is ready! 
Now let's try to draw a man's portrait.
There is also an alternative method of painting a portrait: work should begin with a central line dividing the face into two symmetrical parts. Then, relative to it, facial features are outlined up to the outer boundaries. This method is used by both experienced artists and beginners.
To perform the exercise, we will choose a three-quarter turn position. First, draw a vertical line on a piece of paper, and then use two light marks to mark the overall height of the head.

Check the proportions.
1.Draw the shape of the eyes and eyebrow arches, making sure their relationships are correct. Please note that the eye closest to you will be slightly larger than the far one. Determine the point of intersection of the far brow arch with the contour of the face.
2. Now draw the nose. Using sketchy, light strokes, try to convey shadows in unlit areas as accurately as possible.
3. Check the height of the ear - with the head positioned frontally, it is the same size as the distance between the lines of the eyes and nose. However, when drawing a three-quarter turn portrait, perspective contraction occurs. Therefore, do not forget to shorten your ear a little and place it at a slight angle. Determine the position of the ear relative to the oval of the face and clarify its shape.
4. Outline the shape of the mouth. Due to the same perspective contraction, the far half of the mouth should be smaller than the near one. The nasolabial fold should expand from the nostrils to the middle of the mouth. Show off your pointed chin.

Identify facial features
1.Draw a horizontal line for the location of the eyes - it should be exactly in the middle between the upper and lower marks. Then show the location and shape of the eyes on it.
2. Divide the upper part of the head in half and outline the hairline.
3. Also mark the lower part of the nose - it is located exactly halfway between the line of the eyes and the lower point of the chin. Now schematically, in a few strokes, convey the shape of the nose.
4. Determine the position of the mouth. Note that the mouth is closer to the nose than the chin, so don't make the common mistake of placing your mouth exactly halfway between the two.

Show shadow areas
1.Use a few light strokes to show the shadow areas on the side of the head facing you. Then outline a light shadow contour, drawing a pencil from the forehead along the cheekbone to the lower lip and chin. Mark the area of the neck and the contours of the falling shadows.
2.Use shadows to highlight the volume of the eyes, nose and mouth. Place a soft shadow with light shading along the hairline. Then define the outline of the face more clearly. Finish with zigzag strokes to depict the head shape at the top.
3.Once again work out the contour of the face on the right. Be careful: the chin area should not protrude too much in the frontal direction.
Work on chiaroscuro
1.Start by deepening the tones of the most accentuated areas. Carefully model the shapes with tonal nuances: in some areas, increase the contrast with the depth of tone, in others, soften the transitions, using an eraser if necessary.
2. The most emphasized in the drawing, as a rule, are the contours of the eyes (sometimes the eyebrows), the shadow area between the nose and the eye, as well as the area of the nostrils. The line where the lips close, the area under the lower lip, and the edge of the chin (depending on lighting conditions) are highlighted quite sharply.
3. Define the hair strands more clearly and work out the shape of the ear. Align the position of your head relative to your shoulders.
4. Towards the end, pay attention that on the unlit side, the darker tones visually move the hair mass deeper, and the highlights highlighted with an eraser help bring the face to the foreground.
Very often, beginning artists neglect the study of the human skeleton and musculature, mistakenly believing that “it will work out just fine.” But ignorance of human anatomy leads to the fact that the drawn person turns out to be unconvincing, and his facial expressions and movements look unnatural.
Therefore, today we will look at the basic principles that you should follow if you want to draw a good and high-quality portrait.
1. Facial proportions
The skull and jaw are a slightly flattened sphere, so when looking at a human face from the front we see something like an egg turned upside down with its narrow side down. Two perpendicular lines running down the middle divide this egg into four parts. Let's look at the details:
- Mark the midpoints of the right and left halves of the horizontal line. The eyes will be located exactly at these points.
- Divide the bottom half of the vertical line into five parts. The bottom of the nose will be located on the second mark from the top, and the line where the lips meet will be located one point below.
- Divide the top half of the vertical line into four parts. The hairline will be located at the second or third mark, this feature varies. The ears are located between the upper eyelid and the tip of the nose, but this rule is only true when the face is not down or up.
Helpful hint: The width of the face is usually the width of five eyes or a little less. The distance between the eyes is equal to the width of one eye. Very rarely in people this distance differs very much from the standard, but this feature will be quite easy to notice. The distance between the lower lip and chin is also equal to the length of one eye.
Another way to measure is to use the distance between the tip of your thumb and index finger. The figure below shows which distances can be measured in this way: ear height, distance from hairline to eyebrows, from eyebrow to nose, from nose to chin and from pupil to pupil.

Profile
In profile we can still see the shape of the egg, but its sharp side points towards the corner. Lines now divide the head into the face and skull.
On the skull:
- The ear is located just behind the vertical line. In size and location, it is still located between the upper eyelid and the tip of the nose.
- The depth of the skull varies within the limits indicated in the picture below in point 4 with dotted lines.
- Everything is located as indicated above.
- The root of the nose coincides with the horizontal line or is slightly higher
- The most convex part is the first point above the horizontal line that marks the line of the eyebrows.

2. Features
Eyes and eyebrows
The eye is simply two arches joined into an almond shape. There is no specific rule in drawing eyes, because the shape of the eyes can be different, and there are a lot of such shapes, but we can notice the following trends:
- The outer corner of the eye can be higher than the inner corner, but not vice versa.
- If the eye shape is almond, then the rounded part of the eye will be closer to the inner corner, and the elongated part will be closer to the outer corner.

Eye details
- The iris is partially hidden under the outer eyelid. It only touches the lower eyelid if the person is looking down, or if the eye is built so that the lower eyelid is higher than usual.
- Eyelashes grow from the inside out, not the other way around, and this is very important when drawing so that they look natural. The eyelashes on the lower eyelid are shorter.
- When trying to draw all the little details (tear ducts, lower eyelid, etc.), remember that detailed drawing does not always mean that the result will be beautiful.
In profile, the eye takes the shape of an arrowhead (with convex or concave sides), with a slight hint of the upper and possibly lower eyelid. In real life, you won't see the iris from the side, you will only see the white of the eye. But an eye without an iris looks strange, so draw at least a hint of it.
As for the eyebrows, the easiest way to draw them is to follow the arch of the upper eyelid. Often the widest part of the eyebrow is closer to the inner part, and the “tail” tending towards the outer part of the eye gradually becomes thinner.
If you look in profile, the shape of the eyebrows changes dramatically and becomes more like a comma. The eyebrow begins where the tips of the eyelashes are located.
The human nose is approximately wedge-shaped, it is quite easy to imagine and draw it in three-dimensional form before drawing in the details.
The dorsum and wings of the nose are flat surfaces that are only outlined at the end, but it is still very important to take these surfaces into account when sketching in order to correctly calculate the proportions. The lower flat part of our wedge in the form of a truncated triangle connects to the wings and the tip of the nose. The wings fold inwards towards the septum to form the nostrils - note that the ventral view shows how the septum begins before the wings and connects to the face. It projects lower than the wings when we look at the nose in profile, which means that in the 3/4 view the far nostril is hidden by the septum.

Just as with the eyes, detailing does not always give good results. Therefore, it is more important to work out the proportions than to pore over details that can ultimately disfigure the drawing. When drawing from the front, the nose looks better if you draw only the lower part. If you are drawing a 3/4 view, then most likely you will be better off drawing the line of the bridge of the nose. You'll have to look at and study a lot of noses to figure out how and when to portray it.

Lips
- The line where the lips meet should be drawn first, as it is the longest and darkest line of the three that form the mouth. It's not just a wavy line, but a whole series of thin curves. In the picture below you can see an exaggerated example that will explain to you the movement of the mouth line. Note that there are different lip shapes and that the base line can reflect the lower or upper lip. Lips can be softened in many ways. The line in the middle can be very straight to reflect a sharp look, or very blurry to weaken the lips. It all depends on the shape of the lips, how plump they are. If you want to achieve symmetry, start from the center and draw one half of the lip, and then the other.
- The two upper tips of the upper lip are the most obvious parts of the mouth, but they can also be either pronounced or almost in one line.
- The lower lip has a soft arch, but can also vary from almost straight to very rounded.
- The upper lip is usually thinner than the lower lip and sticks out less from the overall topography of the face than the lower lip. Try to highlight the upper lip with strokes.
- The sides of the lips are shaped like an arrowhead, and the fact that the upper lip protrudes slightly forward in this place can be seen very clearly.
- The midline of the mouth at the ends deviates downward from the lips. Even if the person smiles, it curves down before going up again. Never draw this line straight up if you are drawing a face in profile.

The most important part of the ear is the long C-shaped outer line. The inside of the ear is like an inverted U. There is also a similar curve just above the earlobe, connected to a small C-shaped arch. In general, the shape of the ear also varies.

When we see the face from the front, the ears are visible in profile:
- The rim, which was previously U-shaped, is now a separate part - as happens when we look at the plate from the side and see its bottom.
- The earlobe will look more like a drop and will stand out.
- How thin the ear line needs to be drawn depends on how close the ears are to the head.
If you look at the head from behind, the ear looks as if separated from the head: the rim is attached to the head by a funnel. Don't be afraid to draw the funnel too big, as it really isn't small.
3. Angle
Being shaped like a ball with a few minor changes, the head is easier to draw than expected. But despite this, you need to study how it looks from different angles. Of course, the appearance of the nose changes first, but the eyebrows, cheekbones, central part of the mouth and chin also change.
When we drew the face from front to back and in profile, we essentially simplified it to a two-dimensional plane. For other viewing angles, we need to think in three-dimensional space.
Look down
- All parts are rounded upward and the ears also move upward.
- Since the nose protrudes forward, it protrudes from the general line of the face and its tip is closer to the mouth.
- The eyebrow curve becomes smoother. In order for it to take a reverse bend, you need to turn your face in some particularly unusual way.
- The upper eyelid becomes more visible and covers most of the eyeball.
- The upper lip almost disappears, and the lower one sticks out more.
- Notice that since the mouth follows a general curve, it appears as if a smile has appeared on the person's face.

Look up
- All parts are rounded down and the ears are also moved down.
- The upper lip becomes fully visible and the mouth appears fuller.
- The brow line becomes more rounded, but the lower eyelid curves downwards, giving the effect of an edgy look.
- The lower part of the nose is clearly visible, and the nostrils are also clearly visible.

Turn sideways
When a person is seen almost from the back, all that is visible is the protruding line of the eyebrows and cheekbones. The neck line protrudes and tends towards the ear. Eyelashes are the next thing that is visible when a person turns his face.
Then part of the eyebrow appears, and the ridge of the lower eyelid and the tip of the nose protruding from behind the cheek become visible.
When the face is already turned almost in profile, the eyeball and lips become visible (but the middle line of the mouth is still small), and the neck line merges with the chin line into one line. You can still see part of the cheek where the nostril hides.

As a rule, the construction of the head begins with more generalized forms; this method of construction is called CUT. Many famous masters began their masterpieces with this method of construction. I think you will be interested to know how this is done. So let's get started.
The depicted head is "cut off".
1) First we need to determine where our head will be on a sheet of paper (A3 or A2 format). To do this, we outline the overall dimensions by measuring the ratio of the width and height of the depicted object. It is best to leave more space on the front side.

2) Next, we’ll outline the overall volume of the head, determine the angle, and the location of the front part in your angle.
3) divide the face into proportional parts of the face (in this perspective the midline of the eyes is located in the middle) outline the tip of the nose, bridge of the nose, brow ridges, midline of the mouth, chin.

4) Let’s find the inclination of the head itself, and the lines of the facial parts in perspective (reduction occurs)
What is closer to us seems larger, what is further away seems smaller, that is, it is shrinking.

5) Let’s find what angle the nose is at and build an axial one for the front part. We start by building the nose.

It all depends on our perspective, if we are below the depicted object, we see the lower edge of the nose, if to the right of the object, we see the right edge of the nose, and the frontal one, in perspective (as in our case. Here are examples of constructing a nose by chipping.

6) in the same way we will construct other parts of the face:
Eyes

Lips and chin

The entire face and head should be built along the edges. And as a result we get this:

WORK ON HATCHING
1) Determine from which side the light falls.

In our case, Top right.
In this case, the edges that receive direct light are the lightest, those that receive the sliding light are slightly darker, and the darkest edges are turned away from the light. One should not forget about reflexes, but they are no brighter than light. If you are drawing a plaster head (as in my case) do not forget about the materiality of the plaster. Border contrasts should be strengthened, and reflexes and light should be brighter.
In the end, this is what happens:


P.S. Thanks to everyone who liked my lesson, I tried my best. I will be glad to see your robots. And good luck to you in your endeavors and talents. If you have questions about the lesson. I will listen and help in any way I can. Sorry for the quality of the images (taken on a mobile phone). The author of the first cutting is Art_Yana. Source
BASIC FORMS
To draw a head from any angle, you must first understand its basic structure. Look at all the obvious details and draw the basic shapes. You can simplify the details of the face so that they can be easily developed and refined later. But we ignore these little things and prepare the simplest base of the head. I use the Andrew Loomis method described in his book “Drawing the Head & Hands.
The head is formed from two figures: a sphere - the skull, and a polygonal block, imitating the jaw and cheekbones.
SKULL IN THE SHAPE OF A SPHERE
The head is flat on both sides, so you can safely cut off the side parts of the sphere. In profile it will be a perfect circle, but from any other angle the shape will be oval because the perspective changes. Divide this oval into four equal parts. The vertical line is the beginning of the jaw line. The horizontal line runs along the line of the eyebrows. The top and bottom edges of the oval will help you find your hairline and the bottom of your nose.

BLOCK-SHAPED JAW AND CHEEKHOUSES
Attach the jaw shape. The top part will start from the eyebrow line, and the back part will extend from the center of the oval. In the picture you see a three-dimensional image of the base of the head with the front and side planes (the bottom part is visible from some angles).

TILTING THE HEAD AT AN ANGLE
STEP 1 – SET THE TILT ANGLE
The angle of inclination is set at the very first stage with the ball. We draw three axes:
X axis - the tilt of the head up and down is determined by the angle of inclination of the horizontal and vertical lines of the oval. When bending or lifting too much, the head will be in foreshortening due to perspective.

Y axis– turning the head (left or right) is conveyed by changing the width of the oval. When the head is turned more towards you, you see more of the front and less of the side, so the oval that is on the side of the face will narrow. Also, when the head turns away from you, you see mainly the side part, and the oval becomes much wider.

Z axis– head tilts to the side are determined by the angle of inclination of the center line, the angle of the oval and its position on the sphere.

STEP 2 – FINDING THIRDS
After choosing the angle of the ball, divide the face into thirds. The distance from the hairline to the eyebrow line should be equal to the distance between the eyebrow line and the bottom of the nose. Add the same segment and get a chin line. Note that the hairline and bottom of the nose run parallel to the top and bottom of the oval when drawn around the head. Imagine your head as a box. The thirds should run along both the side and front planes.

STEP 3 – ADDING THE JAW
A common mistake in this area is the jaw being too long in relation to the ball. Make sure you mark all thirds correctly. Notice how the shape of the jaw changes depending on the angle of inclination.

STEP 4 – ADDING FACE DETAILS
When the foundation is laid correctly, it becomes much easier to add facial details in the right places. I will tell you about every detail of the face (eyes, nose, lips, ears) in the following lessons, don’t miss it!

Practice drawing heads from completely different angles. Take your sketchbook and sketch it with little heads. Do not use photo samples for this, then you can easily find your weak points.


