Photoshop is truly a wonderful tool in your hands. knowledgeable person. With its help, you can change the original image so much that it turns into an independent work.
If you are haunted by the fame of Andy Warhol, then this lesson is for you. Today we will make from regular photo portrait in pop art style using filters and adjustment layers.
Almost any images are suitable for processing. It is difficult to imagine in advance how the filters will work, so the selection suitable photo may take quite a long time.

The first step (preparatory) is to separate the model from the white background. How to do this, read the article at the link below.
Posterization
- Remove visibility from the background layer and desaturate the cut out model using a keyboard shortcut CTRL+SHIFT+U. Don't forget to switch to the appropriate layer.

- In our case, the shadows and highlights are not very well expressed in the image, so we press the key combination CTRL+L, calling "Levels". Move the outer sliders to the center, increasing the contrast, and click OK.

- Go to the menu "Filter - Simulate - Outlined Edges".

- "Edge thickness" And "Intensity" we remove it to zero, and "Posterization" give the value 2.

The result should be approximately the same as in the example:

- The next step is posterization. Create a corresponding adjustment layer.

- Drag the slider to the value 3
. This setting can be individual for each image, but in most cases, three is suitable. Look at the result.

- Create a merged copy of layers using a keyboard shortcut CTRL+ALT+SHIFT+E.
- Next we take the tool "Brush".

- We need to paint over the extra areas in the image. The algorithm is as follows: if we want to remove black or gray dots from white areas, then press and hold ALT, taking a color sample (white) and painting; if we want to clean gray, do the same on the gray area; with black areas everything is the same.

- Create a new layer in the palette and drag it under the portrait layer.

- Fill the layer with the same gray as in the portrait.

Posterization is complete, let's move on to toning.
Toning
To add color to the portrait we will use an adjustment layer "Gradient Map". Don't forget that the adjustment layer should be at the very top of the palette.

To color the portrait, we need a three-color gradient.

After selecting the gradient, click on the window with the sample.


The color is adjusted as follows: double-click on the point and select a color.

Thus, by adjusting the colors for the control points, we achieve the desired result.

This concludes the lesson on creating a portrait in pop art style in Photoshop. In this way you can create huge amount color options and place them on the poster.
Graphic editors nowadays are capable of a lot. Using them, you can change a photo by removing anything from it or adding anyone you want. By using graphic editor you can make art from regular photography, and this article will talk about how to make art from a photo in Photoshop.
First, you need to download the program from the link above and install it, which this article will help you with.
Preparing the photo
After installation, you need to open the photo you need. To do this, you need to open the “File” submenu and click on the “Open” button, after which, in the window that appears, you need to select the photo you need.

After this you need to get rid of the background. To do this, create a duplicate layer by dragging the main background onto the “Create a new layer” icon, and fill the main background with white using the “Fill” tool.


Now let's erase background using the Eraser tool and apply a layer mask by right-clicking on the mask.

Correction
Once the image is ready, it’s time to apply the correction, but before that, create a duplicate of the finished layer by dragging it onto the “Create New Layer” icon. Make the new layer invisible by clicking on the eye next to it.
Now select the visible layer and go to “Image-Adjustments-Threshold”. In the window that appears, set the black and white ratio that best suits the image.

Now remove the invisibility from the copy, and set the opacity to 60%.

Now go back to “Image-Adjustments-Threshold” and add shadows.

Next, you need to merge the layers by selecting them and pressing the “Ctrl+E” key combination. Then we paint the background in the color of the shadow (we roughly match it). And after that we combine the background and the remaining layer. You can also use an eraser to erase unnecessary parts or add black to the parts of the image you need.
Now you need to add color to the image. To do this, you need to open the gradient map, which is located in the drop-down list of the button for creating a new adjustment layer.

By clicking on the color strip, we open the color selection window and select a three-color set there. Afterwards, for each square we select a color.

That’s it, your pop art portrait is ready, you can save it in the format you need by pressing the key combination “Ctrl+Shift+S”.

Everyone knows that Adobe Photoshop allows you to create whatever you want with photographs and images. Most users resort to using Photoshop only when there is a need to do retouching, correct the skin and face. However, you can also create very interesting and unusual effects for photos. There are many effects and it is impossible to talk about each one. In this article we will figure out how to make art from a photo in Photoshop. Let's get started. Let's go!
Interesting effects in action

For example, take a photograph of a famous actor
The first step is to choose the photo you will work with. Next, create a duplicate layer. Please note that it is always better to work with the duplicate rather than the image itself. Now go to the “Filter” menu and in the list that appears, click “Blur”. Select "Smart blur". In the window that opens, you need to set the desired parameters. In the "Quality" section, select "High" and in the "Mode" section, select "Edge Only". Move the Radius and Threshold sliders to get the desired result. Choose values close to 8 for Radius and 48 for Threshold.

We set the parameters close to what is shown in the example
On next step it is necessary to invert the resulting image. To do this, use the keyboard shortcut Ctrl+I. Now you can turn off the current layer. Above the layer with original photo create a new one and fill it with white.

Next, create in separate document horizontal lines. Use the keyboard shortcut Shift+Ctrl+Alt by pressing the right arrow to copy the line. Copy about 20 or more of them. Combine all the lines together, and then rotate them at an angle of 45 degrees.
The next step is to select a square 100x100 pixels in size and cut out a fragment with lines so that the result is a square completely filled with lines.
Now you need to exactly repeat the last two steps only with the lines inclined in the opposite direction.
Go back to the main document and duplicate the layer, then place it above the white layer. Open the “Image” menu, click “Adjustments” in the pop-up window. Then select Threshold. In the corresponding box, set the level value. It should be close to 118. In principle, you can stop at this step, but let's go further and use the prepared blanks with lines.

Isohelium image correction
Go to the layer style and check the box for “Pattern Overlay”. In the “Blend Mode” section, set it to “Lighteen”. Next, select the striped pattern you created earlier.

The main effect is achieved precisely by the combination of inclined lines
Now we need to convert the layer into a smart object. Right-click on the layer and select “Convert to smart Object”. Set the layer's blending mode to "Multiply".
Create a new duplicate of the original layer, moving it to the top. Apply isohelium to it, overlay the layer and convert it to a smart object similar to the previous steps, only now set the isohelium level to 100 instead of 118, and use a reverse stripe pattern when overlaying the layer. Turn on the layer that you turned off at the very beginning. Ready.
After this you can add some texture. Apply it to the resulting image by overlay, selecting the “Multiply” mode. Adjust the transparency level and your art is ready.

Now let's look at how to make pop art in Photoshop. This is a fairly popular effect that is often used by social network users.

Original photo for pop art
After selecting the photo you want, make a duplicate layer. Open the Filter menu, then go to Artistic and select Cutout. In the parameters window, move the sliders “Number of Levels”, “Edge Simplicity”, “Edge Fidelity” so as to get the desired result.

Move the sliders as desired
The next step is to create another duplicate layer, but this time the one to which you applied the filter. Go to the Filter Gallery, this can be done through the “Filter” menu. Then open the "Sketch" section. There you will find the “Halftone Pattern”, which is exactly what you need. On the right, in the settings block, set “Dot” in the “Pattern Type” item and move the sliders to get the desired look.

Dot size and contrast may vary
Next, set the blending mode to “Overlay”. You can stop at this stage if you are satisfied with the resulting photo. You can also select the original layer, duplicate it and place it above all the others, and then adjust the transparency value based on your own preferences. Ready.

Simple manipulations - new pop art is ready
It was in the climate of experimentation and consumerism of the late 1950s in England and America that Pop Art emerged - a movement of a new generation of artists who sought inspiration in everyday life, creating art from household goods, consumer goods and media.
Pop Art: Art of the 20th Century
Pop art artists, or popular artists, created in a straightforward manner, using bold bright colors, used screen printing and silk-screen printing for the rapid and mass production of paintings, while downplaying the value and exclusivity of the artist’s work, depersonalizing his activities. The art direction was called " pop art"(short for "popular art" - "popular art").
This movement appeared as a response to the work of the abstract expressionists, whose creations dominated the American art in the post-war period, and subsequently in general as a counterweight " high art" Pop art artists preferred to see a return to reality, everyday images, wit and irony in their works.

Popular artists sought to combine traditions fine arts with elements of pop culture from television, cinema, cartoons, printed gloss and advertising.
At the same time, their work challenged the traditional boundaries between different media, combining elements of painting and graphics with photography and printing, elements self made and mass production, as well as combining different objects, images and sometimes text to create new meanings. Although the popularity of pop art peaked in the last century, this trend still has many followers who create paintings in a modern style.

The founders of pop art are Richard Hamilton and Eduardo Paolozzi, but now this style is primarily associated with the names of Andy Warhol, Roy Lichtenstein, James Rosenquist, Robert Rauschenberg, Claes Oldenburg and other artists.

Perhaps the most famous figure among them is Andy Warhol - American artist, director, designer, producer and one of the most contradictory personalities in the art of the 20th century. His works are famous all over the world, and some of them are among the most expensive paintings ever sold.
TOP 5 most famous works of Andy Warhol
Marilyn Monroe (1962-1967)
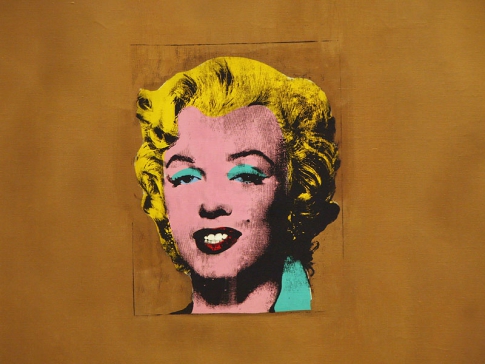
This photo of Marilyn Monroe is the most famous image among the works of Andy Warhol and pop art in general.
He created his first work, entitled “Golden Marilyn,” in 1962, when the actress committed suicide. To do this, Warhol used a black and white promotional photo for the film “Niagara” (1953) with an image of Marilyn, painted over the canvas with shimmering gold paint and imprinted the movie star’s face right in the center of this composition. Thus, by duplicating photography, Warhol undermines the uniqueness and authenticity of the characteristics of the traditional portrait, showing that it can be an infinitely reproducible image.
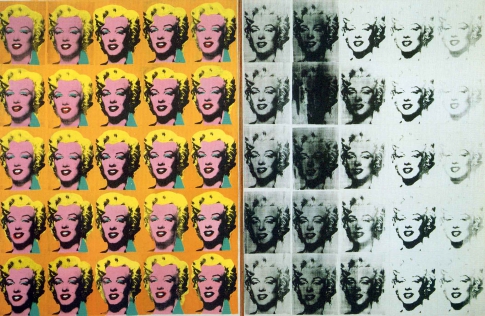
Warhol uses this same photograph to create entire series of images. Each work with Marilyn was an experiment in color and shadows. Thanks to the silkscreen technique and the help of his assistants, Warhol was able to very quickly create such paintings in the style pop art.

Warhol later created five portraits of Marilyn in red, blue, orange, sage and turquoise colors. Happened with the first four works interesting story: at one of the Warhol exhibitions, one of the guest artists shot them with a pistol (she just asked the artist for permission to “click” the paintings, and the word “shoot” in English means not only to shoot, but also to take photographs). However, this only increased the popularity of the paintings: they were called “Shot by Marilyn”, and their price increased.
The fifth painting that survived turned out to be “Turquoise Marilyn,” and it is the reproductions of this work that are now most widely reproduced.
Campbell Soup Cans (1962)

They say it's the owner art gallery and interior designer Muriel Latow gave Warhol the idea for this pop art painting when he said he should paint objects that people see around them every day.
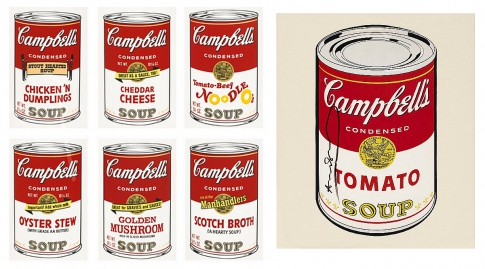
This work is an early example of Warhol's series of repeated images representing consumer goods. The artist painted cans of soup more than once: there is a painting where the can is depicted in a single copy, a painting where six cans are presented, and there are variant images of entire rows of cans with different flavors of soup: “32 cans of Campbell soup,” “100 cans of soup.” Campbell" and "200 cans of Campbell's soup."
200 dollar bills (1962)

When Warhol asked his friends what pop art drawings they would still like to see, one of the girls he knew asked him what he really loved most. It was then that Warhol had the idea to paint a dollar bill - this is truly the most popular and most widespread object of our time. The picture does not depict anything superfluous, only two hundred one-dollar bills laid out in continuous rows.
Eight Elvises (1963)
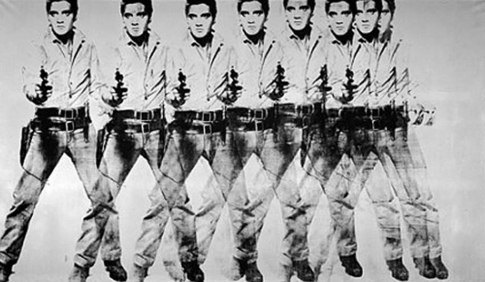
This twelve-foot monochrome pop art painting features eight identical, overlapping drawings of Elvis Presley in cowboy attire. It is unique because it was not mass produced like most of Warhol's works. In 2008, "Eight Elvises" was sold for one hundred million US dollars - it remains one of the most expensive paintings ever sold and is considered one of Warhol's masterpieces.
Banana (1967)

In 1965, Warhol became the manager of the famous American rock band under called The Velvet Underground, which wasn't popular at the time. In collaboration with famous artist the group releases their debut album, the cover of which was this pop art illustration of a banana, Warhol's signature and the phrase "Peel slowly and see."
How to make a pop art portrait in Photoshop
The pop art style is still very popular now: in this style they not only paint pictures, but also do makeup for themed parties and holidays, paint body art, and also stylize photographs. If you also want to make a photo in the pop art style, then there is nothing complicated about it - you only need Photoshop and digital photography, which you want to transform.
To make a pop art portrait work well, it is better to use a photograph of a person close up or at least shoulder-deep.
- Open your photo in the editor.

- Apply isohelium, or posterization, to it (“Image” - “Correction” - “Posterization”). In the window that pops up, select the number of posterization levels - 2.

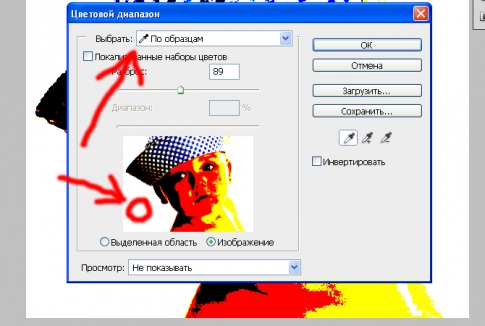
- Go to “Selection” - “Color Range”. A window will open in which you will need to click on the drop-down menu and select “By samples”. The cursor will turn into an eyedropper tool, with which you need to select the white color - to do this, simply click on the white field of the document. If your photo has a multi-colored background, use an eraser or brush white in the toolbar to outline the person in the photo and fill in the background.
- Now find the Fill tool in the left panel. Select the color you like from the palette and click white background left mouse button. The entire connected white field of the photo will turn this color.

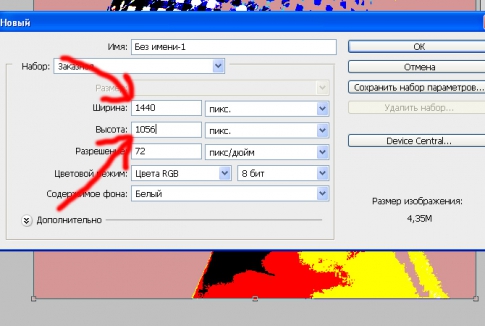
- So we got the first piece of our future collage. But we will need as many as four pictures in the pop art style for it, so we create new document(“File” - “Create”) and set the size of the work area. To accurately determine it, check the dimensions of the first photo - the new document should be twice as wide and twice as long.
- Return to the first photo, go to the “Selection” menu and select “All”. Using the “Ctrl+C” key combination, copy the resulting selection. Go to the newly created document and paste the copied selection into the white field (“Ctrl+V”).
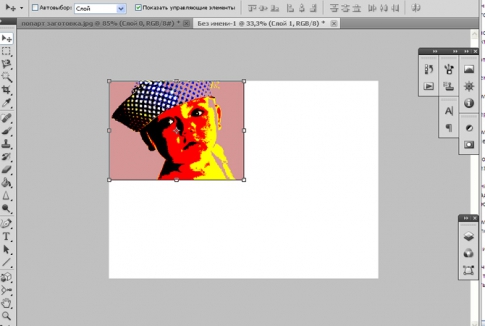
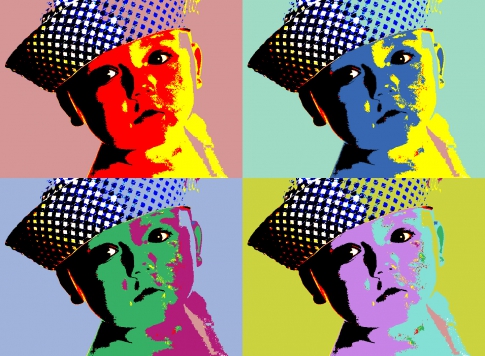
- After that, copy the pop art photo and move it to the right of the first one. All you have to do is copy the photo again, use fill and change the colors of the collage’s constituent parts so that they differ from each other.
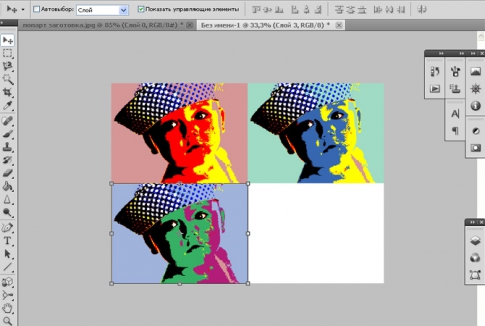
- That's all - you will get a similar style collage pop art.
You will learn how to make a pop art painting with your own hands using a stencil, paper and paints in this video:
Take it for yourself and tell your friends!
Read also on our website:
Show more
Almost everyone knows about famous landmark sculptures like the Statue of Liberty in New York or the Little Mermaid in Copenhagen. However, there are others, not very well known, but very unusual sculptures that decorate cities around the world – we have collected some of the most dynamic ones in this article.
December 31, 2015 Sergey Somov
In this article I will reveal to you terrible secret, namely, it’s not worth paying money for a fashionable portrait in the pop art style. Why? Yes, everything is very simple). You are able to make it yourself, on canvas, with your own hands, even if you don’t professional artist! And this is not a “magic pill”, you will still have to work, but the whole process will be interesting, exciting and perhaps captivating. How to make it?
Material for DIY pop art portrait:
1. We will work on canvas. It is sold in any art store. If you suddenly live in Moscow, read this article. 
2. Brushes and paints. I suggest using acrylic paints(dries quickly, colorfast, not the most expensive), and brushes of your choice (kolin, synthetic, bristles).
3. Prepared sketch in the program (we covered this topic in the article). If you have any difficulties at this stage, contact any company that creates portraits in the pop art style, they provide a free sketch), tell them what you plan to order, and they will make you a series of sketches. Cheat a little!). 
4. A sharpened pencil, a piece of charcoal or sepia (all this is sold for pennies in art stores). 
The most interesting thing is that the portrait itself on canvas in any workshop will cost from 5,000 thousand rubles, but to make it yourself, with your own hands, will cost no more than 1,000 rubles). How do you like it? Just imagine what its cost is and how much people overpay!
Let's make a pop art portrait together on canvas?
Take your sketch, electronic form, and print at any printing house, of which there are plenty in any city. Printing will cost approximately 50 rubles. It is important that the size of the image on the sheet is the same as your canvas (what size you will have is up to you). 
You have printed it. We take this sheet of paper, turn it over and place it on the floor or any flat surface. With our piece of charcoal or sepia (I use sepia) we begin to rub on back side paper until the surface is completely covered.  Now, put this image on the canvas so that your sepia or charcoal is in contact with the surface of the canvas. We secure it all with tape so that the paper does not move.
  And with a sharp pencil we outline all the lines of our future pop art portrait.
We're filming everything. Voila!!!  There is no need to waste time drawing, worrying about what will be similar or not similar. Now you are absolutely sure that it will be exactly the same as in the sketch. May my brothers in art and the numerous workshops that I deprive of income forgive me. But the truth is that each of us can make a stylish portrait our own with my own hands. Well, there's little left to do. Mix desired color, and just paint it in in the right place, as in the sketch. As a rule, in the pop art style, the colors are not complex, but bright, and almost straight out of a tube.
We paint over the ends of our portrait, wait 10 minutes, and that’s it! The portrait you made yourself, saving at least 4 thousand rubles, is ready! 
Well, now, by the way, you can open a fashion workshop and earn good money). And believe me, absolutely anyone can do this in one day! I am confident in the result, but if something is not clear, you can call or write to the contacts indicated on the website. Good luck everyone!
We provide lessons for both beginners and experienced artists. Our drawing and painting studio is located on Tsvetnoy Boulevard in Moscow.
Subscribe to our VKontakte group


