
By the way, there is interesting way coloring using colored corrugated paper. You must first draw leaves on paper in exactly the same way with white wax crayon. After this, tear corrugated paper of autumn colors (red, yellow, orange, brown) into small pieces and, thoroughly wetting each piece in water, stick them onto the drawing. Make sure that there are no two pieces of paper of the same color next to each other. Let the paper dry a little (but not completely!), and then remove it from the drawing. You will get a wonderful multi-colored background. Leave the work to dry completely, then put it under the press.

Method 2.
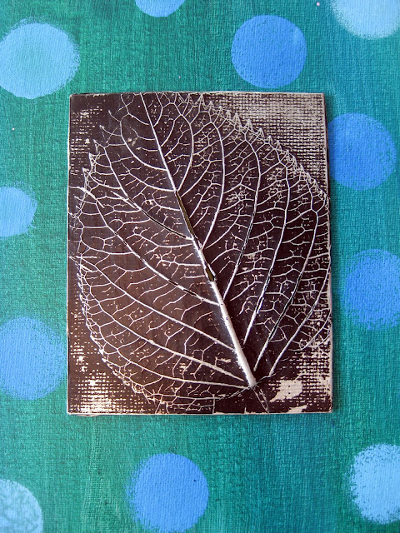
You can make an interesting autumn craft if you place the leaf under thin foil. The foil should be placed with the shiny side up. After this, you need to carefully smooth the foil with your fingertips so that the design appears. Next you need to cover it with a layer of black paint (this can be gouache, ink, tempera). Once the paint is dry, very gently scrub the painting with a steel wool pad. The protruding veins of the leaf will shine, and dark paint will remain in the recesses. Now you can paste the resulting relief onto a sheet of colored cardboard.
Autumn leaves. How to draw autumn
Method 3.
A very simple and at the same time effective technique is to print leaves on paper, onto which paint is first applied. You can use any paint, just apply it to the side of the leaves where the veins appear.

Link
Here are prints of rowan leaves. And any kid can draw rowan berries - they are made using a cotton swab with red paint.

Link
You can create a beautiful autumn design if you print leaves with white paint on a sheet of dark-colored cardboard. When the paint dries, you need to color the leaves with colored pencils. It will turn out beautiful if some leaves are left white.


The background can be left as is, or made colorful by painting with paints using a sponge. In this case, you need to leave a small unpainted space around the leaves.


If you decide to make the background colored, then the leaves themselves can be left white.

How to draw autumn leaves. Autumn crafts
Method 4.
To add volume to your drawings, you can use the following interesting technology. You will need thin wrapping paper or crepe paper white.


Method 6.
Another original autumn pattern, made in warm and cold colors. The leaves themselves are drawn in warm colors (yellow, red, orange), the background is in cold colors (green, blue, purple). To do this job you will need a compass.

1. Draw some leaves different shapes on paper.
2. Now, using a compass, draw a circle of small radius in the lower left corner of the piece of paper. Next, adding about 1 cm at a time, draw circles of larger and larger radius, as far as the compass allows.
3. Now do the same in the upper right corner.
4. Finally, color autumn leaves felt-tip pens or pencils in warm colors (the colors should alternate sequentially), and the background in cold colors.
Maple Leaf. Maple leaf drawing
Method 7.
Help your child draw on a piece of paper Maple Leaf. Divide it into sectors by veins. Let the child paint each sector of the leaf with some special pattern.


You can combine two methods.


Autumn crafts for children
Method 8.
Another unusual autumn pattern.

1. Draw leaves of different shapes on paper. They should occupy the entire sheet of paper, but not touch each other. Some of the leaves should start from the borders of the sheet of paper. Draw only the outlines of the leaves, without veins.
2. Now using a simple pencil and rulers, draw two lines from left to right and two from top to bottom. The lines should cross the leaves, dividing them into sectors.
3. Choose two colors for the background and two colors for the leaves. Color them in the chosen colors as in the picture.
4. When the paint has dried, trace the outlines of the leaves and the drawn lines with a gold marker.
Drawings on the theme of autumn
Method 9.
To make this fall craft, you will need regular newspaper and paints (including white paint).
1. Draw a maple leaf on a piece of newspaper.

2. Paint it and, after the paint has dried, cut it out.


3. Take another sheet of newspaper and use white paint to draw and color a large square on it.

4. Place your sheet over the paint and wait for it to dry completely.

5. This is what you should get in the end!
We offer detailed instructions on painting an autumn landscape in gouache. Finished painting will be a wonderful interior decoration, especially when framed in a baguette.
This creative master class will help you improve your skills in working with gouache, learn how to draw the reflection of trees in water, develop a sense of composition and the ability to reflect the beauty of nature in a drawing.
You will need: gouache, watercolor paper, brushes.

Execution steps:
1. Draw the horizon line with light blue.

2. Cover the upper part of the sky with dark blue.

3. Add white gouache and paint over the rest of the sky up to the horizon line.

4. Draw the water, painting the background light blue, turning into dark blue.

5. Draw clouds with white gouache.

6. Draw the earth with small strokes of brown, light brown and yellow.

7. Draw a tree in the background

8. Against the background of water, draw a mirror image of this tree

9. Draw a few more trees in the same way

10. We paint the crown of the tree with bright autumn colors using a semi-dry brush using the poking method, and in the reflection of the water we use less saturated shades.

11. Using the same principle, we draw the remaining trees.

12. We can finish drawing the Christmas tree and bushes.

13. On foreground draw a pine tree trunk and branches.

14. Draw a pine crown green paint horizontal strokes.

15. Draw horizontal stripes against the background of water with a semi-dry thin brush using white gouache. We draw a couple more trees next to the pine tree.

16. Using a semi-dry brush using the poking method, we paint tree crowns, fallen leaves with small strokes of the same colors and grass.

Your work is ready! Now you can decorate it with a baguette and decorate the interior, or you can give it as a gift.

Of course, it is not necessary to draw exactly as shown in the master class, because this is a creative process.We wish you inspiration and success!
Summary: DIY autumn crafts for children. Autumn drawings. How to draw autumn. Autumn leaves. Drawings of autumn trees. Paintings on the theme of autumn.
We have divided the article into two parts. In the first part we will teach you how to draw in different ways autumn trees. In the second part of the article we will tell you how to draw autumn leaves.
1. Autumn drawings. Drawing autumn trees
The easiest way to draw a tree is by blowing it from a straw. For this purpose black or brown paint draw a trunk and a few branches, trying to leave as much paint on the paper as possible. And now the fun begins! Take a straw and blow the twigs through it. You can do it beautiful tree, which at the same time looks very natural!

To make it autumn you can:
Draw a tree on a pre-prepared colored background made in autumn tones

Draw autumn leaves with a cotton swab or fingers


Use a hole punch to make confetti and pour it onto the areas of the design that previously need to be coated with glue.


Make an applique from dry leaves

Using a regular flower sprayer, spray paint mixed with a small amount of water. If you do not have a spray bottle, then an old one will replace it Toothbrush or a hard brush.


2. Draw autumn. Drawings on the theme of autumn
You can also try to draw trees that are not of the usual shape, but some unusual, intricate, fabulous ones. For example, these.

This way you can draw a whole autumn forest

3. Autumn forest. Drawing an autumn forest
Many people are probably familiar with the technique of creating leaf prints on paper. To print a sheet, you can use absolutely any paint, you will just get slightly different prints. Paint should be applied to the side with veins. You can paint the sheet either with one color or with different colors.

By printing leaves on paper, you can make postcards or something else interesting. But if you print large leaf, then it will turn out to be a real tree!

Using the same principle, you can make an entire autumn forest.

4. Autumn applique. Application on the theme of autumn
Well, those who don’t like to draw can make an applique from autumn leaves"Autumn forest".
Unconventional drawing. Autumn
Master class on drawing. Autumn landscape
Kokorina Elena Yurievna, teacher visual arts, Municipal Educational Establishment Slavninskaya Secondary comprehensive school, Tver region, Torzhok district.
Purpose of work: master class on drawing in unconventional technology drawing is intended for children from 5 years old, educators, teachers primary classes and fine arts, teachers additional education. The drawing can be used to decorate the interior or as a gift.
Target: creating a drawing on the theme “Autumn” using unconventional way in drawing: using a cotton swab.
Tasks:
1) open up space for children's imagination;
2) create a drawing using gouache, cotton swabs, and a painting brush with stiff bristles;
3) development creative thinking, interest in independent activity, fantasy and imagination.
Materials: gouache, painting brush (bristles No. 5 - No. 8), sippy cup water, sheet of tinted cardboard, cotton swabs, black wax pencil.

Children, getting acquainted with the world around them, try to reflect it in their activities - games, drawing, modeling, stories, etc. Visual activity, in this regard, presents very rich possibilities. In order not to limit the children’s ability to express impressions of the world around them, a traditional set of visual means and materials is not enough. The more diverse the conditions in which it occurs visual activity, content, forms, methods and techniques of working with children, as well as the materials with which they work, the more intensively children’s artistic abilities will develop.
Non-traditional drawing techniques are an impetus for the development of imagination, creativity, the manifestation of independence, initiative, and expression of individuality. Applying and combining different ways images in one drawing, children learn to think, to independently decide which technique to use to make this or that image expressive.

Blue sky, bright flowers,
Golden autumn of wonderful beauty.
How much sun, light, gentle warmth,
Autumn gave us this Indian summer.
We are glad to see the last warm, clear days,
Honey mushrooms on stumps, cranes in the sky.
As if an artist with a bold hand
I painted the birch trees with gold paint,
And, adding red, he painted the bushes
Maples and aspens of wondrous beauty.
It turned out to be autumn—you can’t take your eyes off it!
Who else can draw like that? (Irina Butrimova)
Let's draw Autumn today. For work, take tinted cardboard of blue color– this way we don’t have to set the color of the sky.
To begin, we will take a wide brush with coarse bristles and ocher gouache and paint the autumn grass: making broad strokes from the bottom up.


Let's take cotton swab, white gouache and draw tree trunks. We draw lines from bottom to top, placing them on at different levels in height and width.

Guess what kind of tree we got: “Slim figure, white sundress” (Birch)
With another stick and yellow gouache, let's start drawing leaves on the birch trees. (For each paint, I suggest taking a new cotton swab, since cotton wool in water begins to spread and beautiful prints cannot be obtained.)


Now we use green gouache, but there will be few such dots, just to highlight the crown.


Add brown spots.


White-legged birches,
Tights with touches,
Curly, tall
Earrings with amber.
They sparkle like coins
polished leaves,
And they wave their branches,
Like girls with handkerchiefs. (F. Sokolova)
Let's draw the birch trunk and add black strokes. You can use black gouache. But this is a little difficult for preschoolers, so I suggest using a black wax pencil or black oil pastel. They easily leave a mark on white paint and do not bleed. To do this, draw along the contour of the white line and add small spots and branch lines. At the bottom we paint the trunk more densely.

For older children, you can use black to draw the trunk. gel pen. The outline will be brighter and more expressive.


Let's draw the grass using brown gouache.


Let's add foliage at the bottom of the birch crowns with yellow paint. We use the “poke” method.


Let's draw the second plan. To do this, take ocher and use the same “poke” method to fill the distance between the foliage of the trees and the grass with small spots.


Shade using black gouache.

Now let's add bright yellow spots.


The work is ready, you can insert it into a frame.

The autumn forest is again in golden decoration,
And the outfit was replaced by a sweet birch tree,
All its leaves were covered with gold,
On top of the head towards the sky in a blue scarf.
You, white birch, are pretty,
And in winter and summer, in early spring,
A playful breeze braids your hair,
Gentle and cool, even playful.
Autumn spares neither silver nor gold,
Like an artist, autumn is rich in colors,
The autumn forest is again in golden decoration,
And the outfit was replaced by a cute birch tree.(L. Bondarenko)
Painting on the theme “Autumn” with children middle group DOW step by step with photos
Author of the work: Ksenia Dyukova, middle school student kindergarten No. 2 of the village of Cherlak, Omsk region.Supervisor: Gordienko Marina Nikolaevna, teacher of kindergarten No. 2 in the village of Cherlak, Omsk region.
Description of work: This master class is intended for children of secondary preschool age, teachers, parents.
Purpose: the work can be used in drawing classes, you can decorate an exhibition of works on autumn theme, use as a gift.
Tasks:
1. Develop children’s ability to use a brush correctly while drawing.
2. Help children select the appropriate color scheme.
3. Develop imagination, speech, fine motor skills.
4. Cultivate accuracy in work.
For work we will need: album sheet, paints, brush, water.

The teacher and children look at illustrations on an autumn theme, talk about the signs of autumn, and read poems on this topic.

"Autumn has come..."
Autumn has come,
Our garden has turned yellow.
Leaves on a birch
They burn with gold.
Don't hear the funny ones
Songs of the nightingale.
The birds have flown away
To distant lands. A. Erikeev
1. The teacher helps the child draw a birch tree. Draw a trunk and branches with a pencil.

2. The child paints our birch tree with white paint.

3.Draw black stripes on the trunk and branches.

4.We begin to draw leaves. For this we take orange paint and with a brush we draw small circles that look like leaves.

5.Birch leaves are colorful in autumn, so we take yellow paint and draw leaves next to the orange ones.

6. Autumn has just begun, so there are also green leaves on the trees, add them to the tree.

7. Take blue paint and draw the sky, add a little white so that the sky does not seem cloudy.

8. Near the birch tree, on the ground, draw grass green. We put paint on the tip of the brush and draw thin stripes.

9. In autumn, the wind blows and leaves fly off the trees, so we decided to depict a small leaf fall.

10.And the birds that fly away warmer climes, draw black paint.

11. All that remains is to decorate our picture with a frame. Cut out strips 1.5 cm wide and glue them along the edge album sheet.

12. Our picture can be placed in a corner of nature.


