August 31, 2010, 21:12
The smallest
The length of the envelope pattern is 80 cm, from here it can be seen that a 50 cm newborn is likely to drown in it. Envelope, so to speak, for growth. But, in my opinion, this envelope is designed specifically for small babies, therefore, do not be discouraged if you want to sew a thing for your child, but take a scale less than 5 cm.
FLEECE ENVELOPE
Maybe but to sew an envelope not from fleece, but, for example, from terry cloth or fromchintzwith synthetic padding.
You will need:
Fleece fabric 80 cm long and 140-150 cm wide
Details:
1 - base;
2 - front part of the cap;
3 - the front of the panties.
Operating procedure:
Draw the pattern to scale. Cut out the details of the envelope without seam allowances. Cut out the front part of the cap (item No. 2, see cap drawing) with an allowance for the lapel. Stitch the details in accordance with the drawing and the drawing (you can make seams there). Connect the corners of the top of the already stitched cap to each other and fix it with a thread by hand. Cut out the rest of the fabric narrow stripes for a brush. Collect the strips in a brush and tiethem in the middle. Sew the tassel by hand to the cap. The seams can be made with an overlock, or sheathe all sections of the envelope with an oblique trim.
COVER FOR CHILD CAR SEAT (cradle)
You will need:
Fleece fabric size: (chair length + 26 cm) X (chair width + 26 cm); elastic band or bias trim, elastic band
Operating procedure:
Draw a pattern according to the dimensions of your chair, where AB = chair width + 26 cm, BD = chair length + 26 cm. empirically. To do this, place the child in a chair and determine the distance from the top of the back of the chair to the head with a centimeter tape, then measure this distance on the pattern with an increase of 13 cm and draw a circle desired diameter. Cut out the fleece cover. Treat the cut of the hole with an oblique trim or elastic band. Treat the cut of the bedspread with a hem for the subsequent threading of elastic bands into it (leave 2 cm of an unstitched area in the hem). Insert the elastic into the hem. Adjust the tension of the elastic band by putting the cover over the chair.
15.11.2002
The smallest
$177 for a baby blanket - isn't that expensive?! I don’t know how convenient it is in practice, but theoretically this blanket can perform several functions: an envelope, sleeping bag and just a blanket. Well, let's save money!
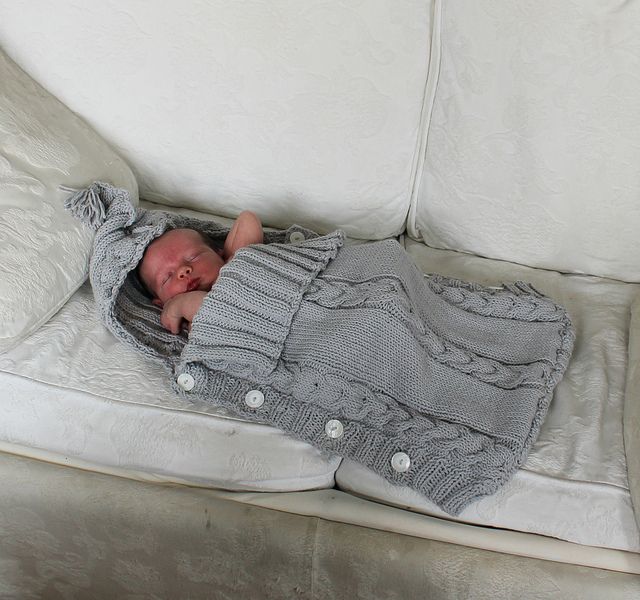
BLANKET-transformer
Photo 2 shows a transformer blanket sewn by me for my baby. Inside, for warming, a lamb skin in a little white duvet cover.
You will need:
cotton fabric with a length of 180 cm and a width of 140-150 cm, synthetic winterizer (the size depends on the number of layers, use the dimensions of the blanket pattern when calculating), 50 cm of elastic, 1 meter of oblique inlay and two zippers: detachable 50-55 cm long and regular 20-25 cm.
Details:
blanket - 2 parts;
pocket - 2 parts;
Operating procedure:
Draw a pocket pattern. Cut out the details of the blanket and pocket from fabric with a seam allowance of 1-1.5 cm, as well as a layer of synthetic winterizer. Fold the “pocket” parts with the right side and stitch along the side where it will later beelastic.
Turn it out, iron the seam and sew from the edge of the stitching at a distance of 1.5-2 cm. Thread the elastic into the resulting drawstring, fix it with pins at a length of 45 cm. Sew the sections of the “pocket” with an oblique trim. Sew a "pocket" to the right side of one piece of the blanket in accordance with the pattern drawing.
Sweep the details of the blanket with synthetic winterizerlightningin the indicated places between the front sides of the parts of the blanket. Sew on the machine along the edge of the blanket, leaving a few centimeters unstitched. Turn the blanket right side out, sew the unstitched section on your hands with a blind stitch. Iron the edges of the blanket.
How to use:
Lay the quilt "pocket" down. Close the zipper up to half of its length. Turn out the "pocket" thus closing the zipper. Now you can put the child in the "envelope". Zip up the zipper to the desired level. Fasten the top zipper, thus forming a cap on the child's head.
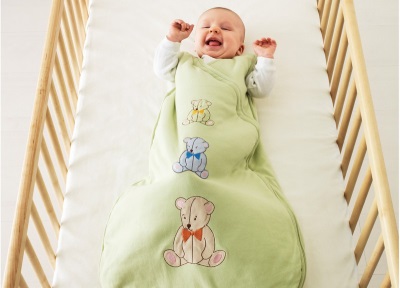
transformer blanket: Top - sewing, fleece inside, insulation - 2 layers of synthetic winterizer.
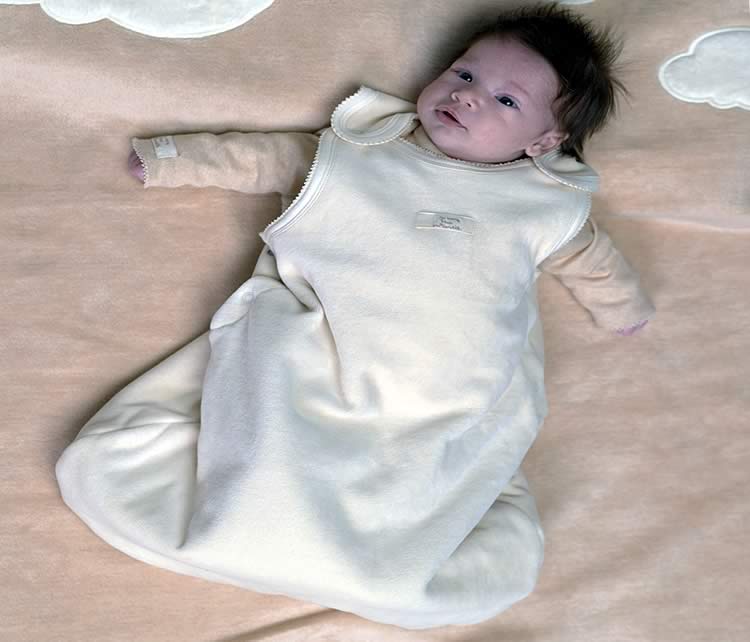
SLEEPING BAG
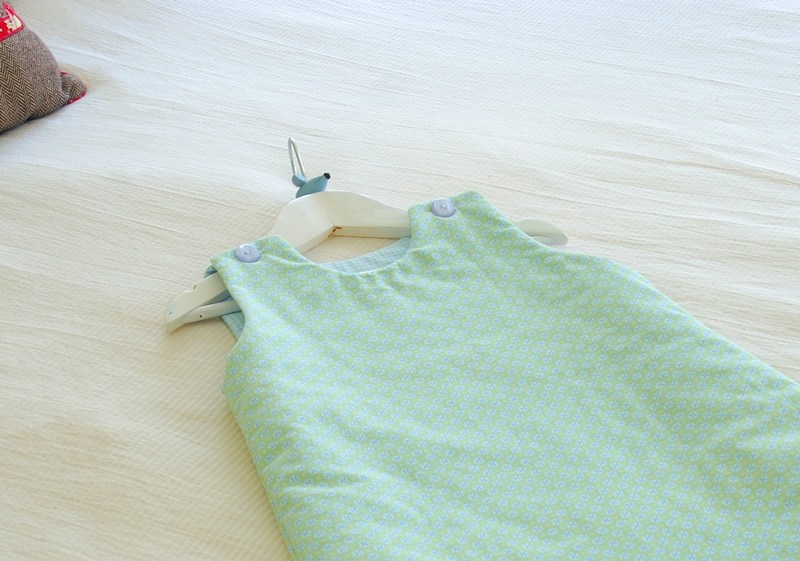
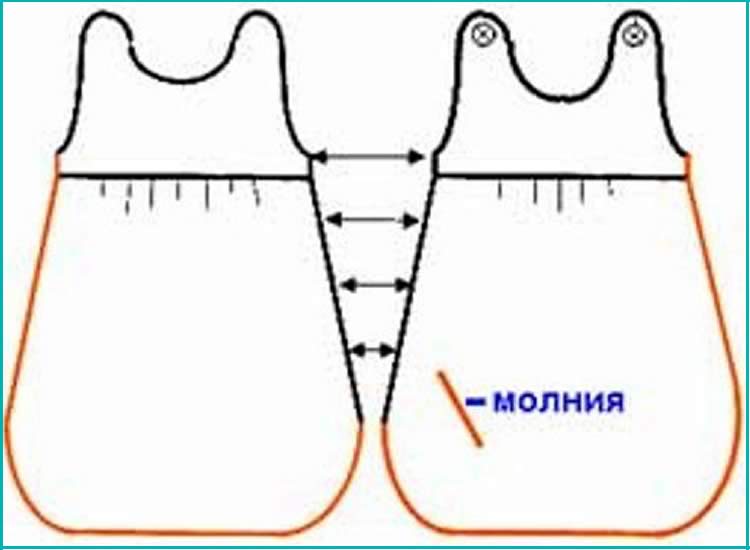
For a newborn, a rounded shape of the bag with fasteners on the shoulders and a zipper along the side seam is suitable, which will make it easier to take the child out and put on the bag.
For kids olderyou can make a rectangular shape and sew a zipper in the middle of the front of the bag.
I offer a pattern for the smallest kids (up to about 4 months).
You will need:
cotton fabric, synthetic winterizer, slanting inlay, zipper 90 cm long and 2 buttons.
Details:
1 - before;
2 - back;
3 - bag.
Operating procedure:
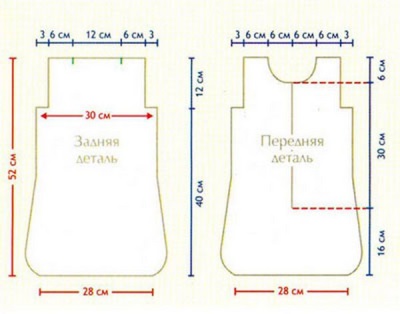
Draw a pattern for a sleeping bag. Cut out the details of the bag from the fabric in a double, and from the synthetic winterizer in a single copy with seam allowances of 1-1.5 cm. Cut out the top of the breast and back without an allowance.
Baste the upper fabric parts with similar parts from synthetic winterizer. Gather the top of part No. 3 up to 34 cm. Stitch the details of the “bag” with the “breast” and “back”. Stitch the front of the bag with the back one at a time.side seam(before rounding).
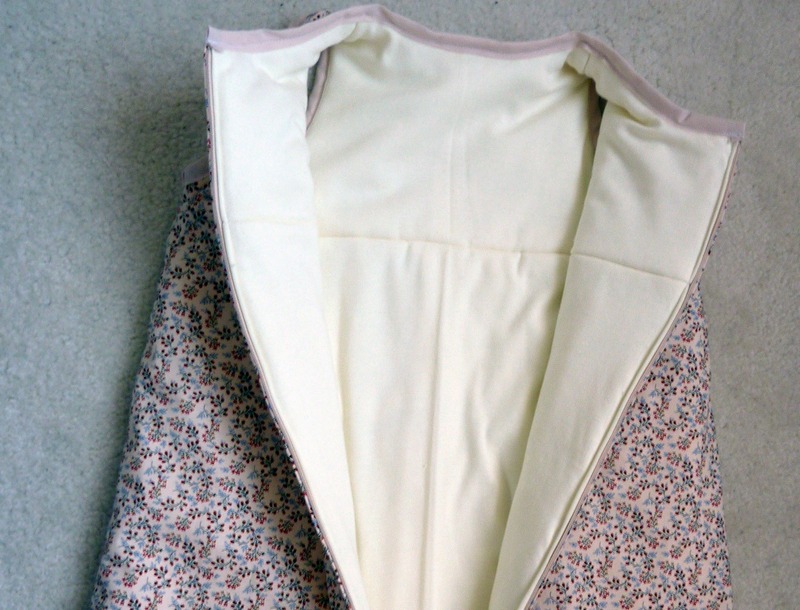
Baste the zipper open to the front of the top of the bag. Sew the inner fabric parts in the same way. Now, fold inner part bag with outer right sides and stitch along the edge from armhole to armhole. Turn inside out and iron the edge of the bag.
Baste the upper sections of the breast and back (armholes, straps, neck) and sheathe them with an oblique trim. Sweep loops on the front straps. Sew buttons to back straps. The sleeping bag is ready. If desired, decorate the breast of the bag with embroidery or appliqué.
24.11.2002
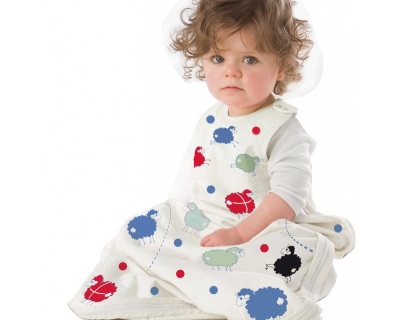
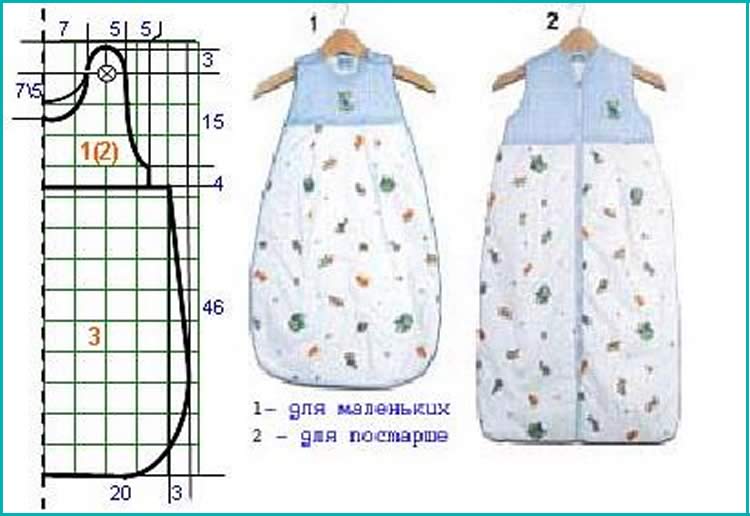
Fig.1 Sleeping bag
http://bulav-ka.narod.ru/atel.files/model.files/detki/det 001.htm #
You will need:
Cotton fabric 150 cm wide with stripes and polka dots, 0.65 m long. Sintepon 150 cm wide, 0.65 m long. Rubber band 3 cm wide. 0.60 m. Rubber band 0.5 cm wide, 1 long .40 m.
Allowances for seams and hem:
I recommend 1.5 cm seam allowances. However, first cut out the parts of the bag that will be quilted in a cage, with large allowances (5 cm). After stitching the part, measure again and cut the allowances to 1.5 cm. Cut without allowances along the upper edge, 6 cm of facing are included in the length of the part.
Cut: (pic 2)
Fig 2 Cutting fabric
Detail of the bag, 140 cm long, 55 cm wide, made of striped fabric with polka dots. 2 straps 55 cm long, 9 cm wide, finished 4.5 cm wide, in striped fabric, do not forget the seam allowances. From the synthetic winterizer, cut out a rectangle equal to the details of the bag. Fold the striped part, synthetic winterizer and polka dot part and then sweep with large basting stitches in a circle and vertical rows.
Check stitch:
From thick paper, or even better from fine sandpaper (it does not slip), make a template 1.00 m long and 5 cm wide. The length of this template depends on the longest stitch line. On the fabric part, mark the first stitch line with basting stitches or tailor's chalk and sew along the marked line. For the rest of the stitch lines, place the template along the stitched seam and sew exactly along the edge of the template. Scribe in the same direction whenever possible.
Sewing technique:
• From top edge of the quilted part of the bag, measure down 6 cm and mark with stitches the fold line for the drawstring under the elastic band. Fold both parts of the bag face to face, stitch from the sides, while on one side above the fold line, leave a 3 cm long hole in the seam for threading the rubber band. Overcast seam allowances and top cut.
• For a drawstring under an elastic band, wrap a 6 cm wide facing inward, sew at a distance of 4 cm from the top edge.
• Fold the straps along the length of the right side inward and sew long sections. Turn the straps inside out, iron the edges and topstitch at a distance of 1 cm and 1.8 cm from the edges. Rubber band 0.5 cm wide, cut into 4 parts 35 cm long each. Using a small safety pin, thread the rubber band between the stitch lines inside the straps. At the ends of the straps, sew the ends of the elastic bands horizontally. Overcast the ends of the straps.
• Sew straps at a distance of 11 cm from the middle from the inside into the seam of attaching the drawstring to the front and back sides of the sleeping bag.
• Use a large safety pin to thread a 3 cm wide elastic band into the drawstring and sew the ends of the elastic band together. Sew the hole in the side seam by hand.Patterns are taken from the indicated sites. The photo of the blue transformer blanket is mine. Made by me according to this pattern. Inside the lamb skin in a duvet cover, attached to the blanket with Velcro.
Who needs to throw off the patterns.
All parents want to provide for their newborn baby Better conditions and comfort. Various things help them in this, one of which is a sleeping bag for newborns.
pros
- Using the bag will ensure that the child stays comfortable during sleep. The baby will not open up, and the discarded blanket will not cause the baby to freeze.
- Mom can feed the little one right in the sleeping bag. She does not need to remove the baby from the heated bed, because of which the baby will freeze during the night feeding.
- Inside the sleeping bag, the child is cozy and comfortable, because the child is accustomed to the cramped conditions of being in the mother's womb.
- "Hugging" from all sides, pleasant to the touch fabric gives the baby not only warmth and comfort, but also safety. In a baby sleeping bag, the baby will sleep on his back (this position is considered the best for newborn sleep), and there will be no dangerous objects near the face. Parents may not worry that the baby is tangled in a blanket or has thrown it over his head.
- When the baby grows up a little, sleeping in a sleeping bag will be an obstacle to getting out of the crib.
- It is convenient to take a sleeping bag with you on a long trip. In it, during the trip, the child can sleep in the same conditions to which he is accustomed at home.
 The sleeping bag will create a baby comfortable conditions for sleep and wakefulness
Minuses
- In a sleeping bag, the child should only be put in a waterproof diaper.
- It will not be possible to quickly change a diaper for a baby sleeping in a baby sleeping bag. While the mother checks the condition of the diaper and changes it, the baby can finally wake up and play out.
- Some children do not want to sleep in such a bag, especially if the baby slept immediately after birth in other conditions to which he has already become accustomed.
When buying a sleeping bag for a newborn baby, you should take into account some of the features of such products in order to choose the best model for the baby.
The size
The sleeping bag must be appropriate for the height of the child. Newborns buy products up to 65 cm in size, babies sleep in a 75 cm bag for 4-9 months, for 9-month-old babies and up to 15 months of age a 90 cm model is used, and older babies buy or sew a sleeping bag from 105 cm in size.
Usually, the length of the bag is chosen so that it exceeds the height of the child by 10-15 cm (height from feet to neck is taken into account). So for a successful purchase, be sure to measure the baby.
 Consider your baby's height when choosing a sleeping bag
Compound
Choose a product for your child made of natural, breathable and hypoallergenic material. As a rule, the lining in children's sleeping bags is 100% cotton. Also, the composition is important for the care of the sleeping bag. It is best to buy a bag that is machine washable.
 Choose only natural materials for your baby
Sleeves
Many sleeping bags for newborns have sleeves, but there are models without sleeves. If the chosen sleeping bag has sleeves, they should be wide enough so as not to interfere with the baby's arms to move. Some bags have sleeves that can be zipped off. There are also products, the length of the sleeves of which is adjustable.
 A sleeping bag with sleeves will keep your little one warm on chilly nights.
Neck
It should not squeeze the child's body. Pick up a bag in which the neck fits the baby freely, and the gap between this part and the baby's neck will be about one and a half centimeters.

Back
The bottom of the sleeping bag should be smooth and without any decoration (decorations, patterns) so that the baby does not experience discomfort during sleep.

Clasps
In most sleeping bags for newborns, the zipper is located in the middle so that it is easy for the baby to change clothes. In models for older children, the fastener is sewn in such a way that it is necessary to unfasten the zipper from the bottom up (this will prevent accidental unfastening at night).
In addition, many children's sleeping bags have shoulder studs. In some models, they can change position, adjusting the sleeping bag to the growth of the baby. On the back, as a rule, there are no fasteners.
When should it be used?
The use of a sleeping bag for a newborn baby and older children is affected by the time of year, as well as the room temperature.
If the product is a light cotton sleeping bag, then the baby can sleep in it at room temperature +22°C.
At a lower temperature (from 19 to 22 ° C), the crumbs are placed in an insulated bag model.
There are also products used at room temperatures below +19°C.
The temperature range for the model you purchase should be found on the sleeping bag label.
![]() Sleeping bags are available for both the hot season and the cool season.
Sleeping bags are available for both the hot season and the cool season.
How to sew with your own hands?
To make a homemade sleeping bag for crumbs, you need to choose a suitable pattern and buy high-quality fabric (knitwear, cotton or other natural material).
patterns
by the most in a simple way to build a sleeping bag pattern for a child will use the clothes that the child wears. Paper is applied to a T-shirt or sliders and the contours of the clothes are marked, then a few centimeters are added on each side so that the product does not squeeze the child and there is enough fabric for the seams. The length of the bag is noted depending on the growth of the baby, adding 15-20 cm to the distance from the shoulders to the feet.
For the back, one piece is cut out, and the front of the bag can be cut both in the form of a one-piece piece and from several pieces (to make an interesting appliqué).
Tailoring process
The cut layers of fabric are sewn with the right sides to each other. A zipper is sewn into the lower part of the product, and fasteners on the shoulders can be represented by buttons or Velcro. If the model is warm, a synthetic winterizer is inserted inside. The front part is optionally decorated with ribbons, appliqué and other decorative elements.
To knit a sleeping bag for a baby, get about 500 g of wool and, depending on the design of the product, a few buttons or a zipper. Prepare knitting needles 4 and 5, circular 3.5, and an auxiliary knitting needle for work. For an elastic band, knit alternately the front and back loops, for the holes for the buttons in the front row, close two loops, and in the wrong side, dial the same number of loops.
For the back of the baby bag, cast on 49 sts on needle 5 and work in stockinette st, inc 1 st every other row up to 59 sts. After 48 cm, begin to decrease the loops for the armholes to 53 loops, and after another 16 cm, bind off 11 loops in the middle, and knit the rest separately. At the same time, close the side loops to get the bevels of the shoulder. All loops should be cast off 17 cm from the armhole start line.
For the front, cast on 69 stitches, work in stockinette stitch or in your desired pattern. Add in every second row a side loop up to 79 loops. After 12 rows, divide the loops and knit separately, 48 cm from the first row, make an armhole, as on the back of the product. As on the back, bind off the middle 10 loops, and also bind off the side loops in every second row.
Knit the sleeves and hood with an elastic band with needles 4. Gather the product, sew in a zipper and sew the sleeves and hood to the back and front using circular needles, making 1 hole for a button on each side. Close the loops and sew on the buttons - the knitted sleeping bag is ready.

Collecting a dowry for a baby, modern mothers are increasingly purchasing a sleeping bag for newborns. This handy little thing appeared on the children's goods market relatively recently, but has already managed to conquer with its practicality.
Why do you need a baby sleeping bag
Being a cross between an envelope and a romper, the sleeping bag makes the baby's sleep more restful and safer than with a regular blanket.
- The cut of the sleeping bag allows the baby to take a comfortable position in his sleep, and the usual tightness gives comfort and a sense of security.
- Mom does not have to constantly adjust the baby's blanket. The chest is always securely covered.
- With a sleeping bag, you can not be afraid that the blanket will inadvertently block the child's breath. Fixing on the shoulders and in the armpits, the bag does not allow the crumbs to "dive" inside.
A variety of models allows parents to choose exactly the cut and material that is suitable for temperature regime in the nursery. For example, if the air does not warm up to 19 degrees, warm, quilted models are chosen, above this threshold - lighter fleece bags, with a temperature of 22 degrees - thin cotton sleeping bags.
We sew a bag with our own hands
Like many baby things, a sleeping bag for newborns can be sewn by hand. Such work is possible even for those mothers who are not very “friends” with a needle, the main thing is to know a few nuances.

To beat the only drawback of the sleeping bag - the inconvenience of changing a diaper, you can not sew its lower part, but make a drawstring.
How to sew a bag - several ways
When buying fabric for a sleeping bag, keep in mind that its length is calculated from the neck to the baby's legs, plus 15 cm. In addition to the fabric, you need to buy fasteners (zippers, buttons) and a bias trim.
For mothers who are far from sewing, bias binding is a tape for finishing edges. Its sides are bent in such a way that even indirect cuts can be processed. It is better to take a wide inlay, for beginner needlewomen it will be more convenient.
Read also:
First way
The easiest way to create a pattern is to circle the top of any of your child's sliders and, after measuring the desired length, round off the bottom.
Now we draw a pattern on paper. In the place where the snake will be, leave 2 cm for the allowance.
The back and front straps are sewn with the right side.
Method two
If the sleeping bag is intended for a newborn, make a snake not in front, but on the side.
For a bag that will fit up to about 4 months, prepare: natural fabric (flanel, cotton), insulation (synthetic winterizer), a 90 cm zipper and a pair of buttons.
Any ready-made pattern is best adjusted exactly to the size of your child. It's easier to do this in a vest.
Third way
A sleeping bag up to the waist, which is held by a wide knitwear elastic band, will become simple in execution. It can also be made from any fabric, depending on how warm it needs to be. For example, we will make the upper part of cotton, we will warm the inner part with a dense jersey. Ribbed knitwear is useful for elastic.

We draw a pattern. To do this, you need to measure the circumference of the waist of the baby and the length from the chest to the legs. We leave allowances for the seams and estimate the optimal width of the bag.
If you increase the seam allowances, the sleeping bag can be converted to a larger size.
We do the processing and basting of the bag parts as in the previous method. Don't forget to leave a hole for turning. Slices where the elastic will be located, do not sew yet.
We take an elastic band about 25 cm wide. We fold the narrow sides with the front part and grind so that we get a wide ring. Now fold it in half inside out. It turns out a four-layer elastic band.
Thematic material:
We stretch the belt along the width of the bag and bait the pins. Gently pulling the fabric, we grind both parts.
Also, according to ready-made patterns, you can sew a sleeping bag with sleeves or even with a hood.

How to knit a sleeping bag
Better than a do-it-yourself sleeping bag can only be a knitted product. Such bags better "lay down" on the baby's body and make sleep more comfortable. Threads are selected only natural - wool or wool with cotton.
For a knitted bag, about 0.5 kg of woolen threads and fasteners - zippers, buttons are useful. From the tools, prepare knitting needles 4.5, circular - 3.5 and one knitting needle with a bend (auxiliary).
For the manufacture of rubber bands front and back loops alternate one at a time.
The back consists of 49 loops on the knitting needle No. 5 with the front surface. Through the row we increase the number of loops until there are 59. When the canvas reaches 48 cm, we reduce it for the armhole to 53 loops. After another 12 cm, we close 11 loops in the center and knit the remaining ones separately. At the same time, we close the side loops under the bend of the shoulder.
The front of the sleeping bag is made in the same knitting technique. Gaining 69 loops, we add through a row one at a time to 79. After 12 rows, the loops are divided and knitted separately, the armhole is performed, as on the back, after 48 cm.
Read feature articles
It's no secret that in the first few weeks after the birth of babies, it is recommended to swaddle. This not only improves their sleep, but also speeds up the process of physical and mental adaptation to the conditions. environment. AT recent times outdated diapers are increasingly being replaced with modern and ergonomic sleeping bags. A sleeping bag for a newborn is easy to make with your own hands. Below is a description of the process of making three models of a product from fabric and yarn.
Fabric sleeping bag
If you have at least a little knowledge of the basics of using a sewing machine, sewing a sleeping bag will not be difficult for you. Even a novice needlewoman can make simple model fabric in one evening.
- natural fabric for the front side of the product (cotton, flannel, wool);
- natural fabric for lining (cotton);
- zipper 20-25 cm long;
- tape or trim for processing edges;
- threads;
- tailor's pins;
- scissors;
- sewing machine.
Operating procedure
An approximate pattern of the product is shown in the diagram below. If desired, it can be slightly adjusted. It should be remembered that the length of the sleeping bag should be equal to the length of the child from shoulders to heels, plus 15-20 cm of stock. We put about 1.5 cm allowances on all seams.
We cut out the front and back parts from the front and lining fabric, sweep them or chop them off with pins. If you plan to use a sleeping bag for walking, insert between two layers of fabric thin layer insulation.
We cut the details, folding them with the front sides inward, turn it inside out and iron the product. We process open seams with an inlay or a special tape, sew in a zipper. The fastener can be moved to the bottom of the sleeping bag for convenience. We decorate the product at our discretion with embroidery or appliqué.
Be sure to wash and steam the bag before use. The sleeping bag for the newborn is ready! By increasing the size of the pattern, you can sew a product for an older child.
Knitted sleeping bag
A very warm and cozy sleeping bag can be knitted. For its manufacture, you should choose only natural yarn, giving preference to wool, cotton and microfiber. If you tie the envelope with a hood, it can also be used for walking.
Necessary materials and equipment
- fine merino wool yarn;
- straight and circular knitting needles No. 5;
- hook number 4;
- buttons.
Operating procedure
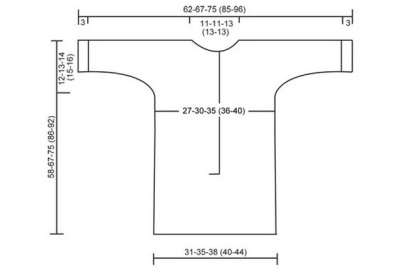
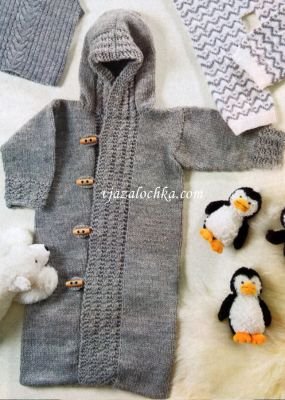
We pre-knit a sample with the front stitch with a thread in two additions to calculate the number of loops and knitting density. Depending on the value obtained, we collect 100-110 loops on circular knitting needles and knit the back along with the shelves in straight and reverse rows. We remove the first edge loop, then we knit with the front stitch (straight rows with front loops, reverse rows with purl loops). The last 15 loops, not counting the hem, we knit with a “pigtail” pattern according to the scheme below.

At a height of about 35 cm, we close several loops for armholes on the sides of the knitted fabric: we knit 29 loops, close 4 loops, knit another 29 loops and again close 4 loops, then we knit according to the pattern. We continue to knit each of the resulting parts separately.
We knit the back with a straight piece until the required height is reached. On the shelves we form a rounded neckline 4-5 cm before reaching the required height of the parts. For sleeves, we collect 36 loops on straight knitting needles, close knitting in a ring and knit the first 5 cm with a “pigtail” pattern. Then we pass to the front surface, evenly reducing 6 loops. In each 4 rows, we add 1 loop to form smooth bevels of the sleeve, until 48 loops are obtained on the knitting needles. To knit the sleeves, we decrease 4 loops on each side and in the next row we close all the loops.
We carry out shoulder seams and we collect 63 loops around the perimeter of the neck, in the next row we evenly add 10 loops. We knit with front stitch. At a height of about 15 cm, we divide the knitted fabric in half and begin to close 2 loops on each side, forming a hood. At the end, we break and thread the thread.
We carry out all other seams. On one of the shelves we crochet the desired number of hinged loops, on the other we sew buttons in the appropriate places. The sleeping bag is ready.
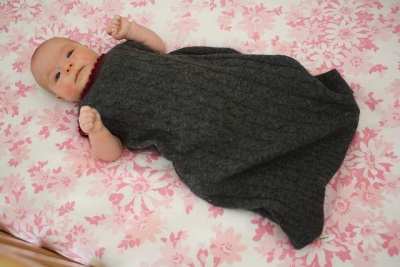
Crochet sleeping bag
An easy-to-make sleeping bag can be crocheted. The model shown in the photo below can be used as a statement envelope.

Necessary materials and equipment
- pink or blue cotton yarn;
- hook number 4;
- zipper length 30-35 cm.
Operating procedure
We are building a scheme for the future sleeping bag. You can use the sewing pattern above or any other. We transfer the pattern to paper and cut it out for convenience.
In strict accordance with the obtained dimensions, we knit the front and back of any pattern you like. In our case, an openwork "shell" pattern is used, made with simple and embossed columns with two crochets.
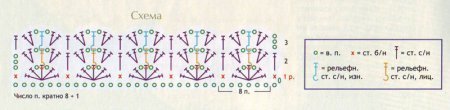
We sew the details with a needle or crochet, sew in a zipper, thread all the threads. For this openwork model, it is recommended to sew a separate fleece lining. At the end, decorate the sleeping bag to your liking and wash it before use.
Video on the topic of the article
In the video tutorials below, you can learn how to make other models of sleeping bags and envelopes for newborns.


