When going to nature with an overnight stay, you will need sleeping bag. You can sew it yourself with your own hands, especially since it is not as difficult as it seems at first glance.
DIY sleeping bag: materials
In order to sew a warm sleeping bag yourself, you will need to have the following materials on hand:
Waterproof raincoat fabric for the outside of the sleeping bag and pleasant to the body cotton for the inside. Also for interior decoration, materials such as poplin, calico and satin are suitable;
Sintepon or holofiber;
Lightning (1 or 2 pieces depending on the model);
Related equipment (scissors, measuring tape, needles or pins, sewing machine).
An elastic band or additional filler may also be useful, depending on the model.
Do-it-yourself sleeping bag options
According to the principle of operation, sleeping bags can radically differ from each other. There are tight bags with a tightened elastic band around the face, and there are loose ones. There are even models for the most fastidious, with slots in the most unexpected places for legs and arms.
sleeping bag envelope
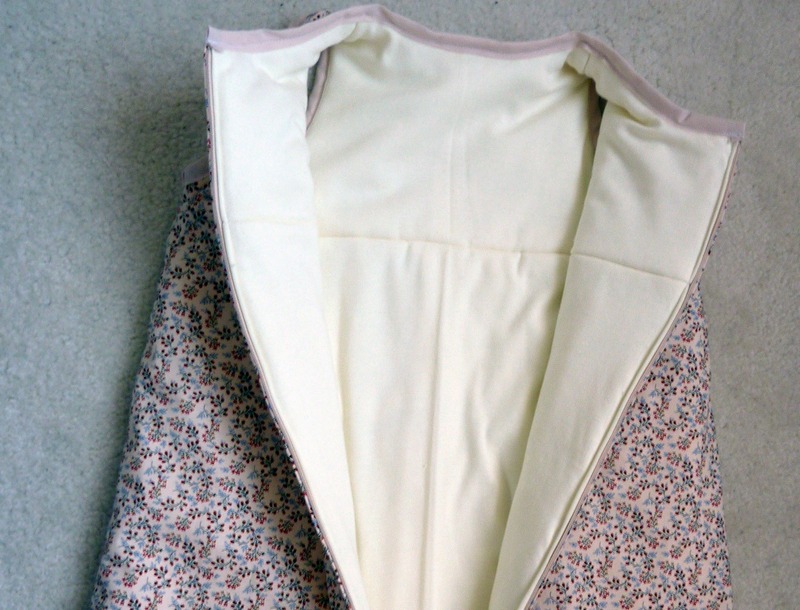
Cutting and sewing such a bag is not at all difficult. For work, you will need two types of fabric (outer waterproof and inner cotton) and a zipper with a length of 100 cm. And if you want to make additional holes for the convenience of arms and legs, then purchase additional zippers in the number of holes planned.
Cut out two identical pieces in the shape of a rectangle from different fabrics. With a height of 190-250 cm and a width of 160-180 cm. Cut two or three parts of the padding polyester with the same rectangles with the same dimensions, depending on how warm you want to make the sleeping bag.
Fold the cut parts in layers in the following order: layers of filler, and on top layers of fabric, folded with the right side to each other. Sew the layers around the perimeter, retreating from the edge of at least one centimeter. Leave a small section unfinished in order to turn the part through it. Sew it inside out with a blind stitch by hand.
You have a large rectangle. It needs to be quilted. Do this in the form of transverse lines passing at the same distance from each other.
Fold the product in half vertically with the front fabric inward. Sew the edges together, with one seam that starts and runs along the bottom edge and rises along the side to the head. Do not forget to add and sew a zipper from the middle of the seam.
Turn the bag right side out. You have an envelope folded in half with a zipper built into one end.
For lovers of a more comfortable sleep, you can complicate this model by making holes for arms and legs in it.
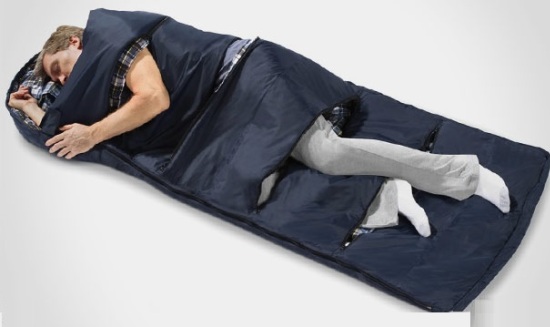
To do this, it is necessary to make cutouts along the quilted lines in the already finished bag in the upper canvas. Insert a zipper between the layers and, wrapping the cut edges inward, sew a seam on a typewriter. Thus, if desired, you can unzip and stick your leg or arm out of the bag. Make as many holes as you like. A sleeping bag with your own hands is ready. In this model, it will be more comfortable to sleep if you take a small pillow for your head with you.
It is also fashionable to make an additional detachable part for the head for this model, which will be fastened and unfastened with a zipper. It is sewn according to the same principle as a whole bag, namely, it is folded in layers, turned inside out, and then a zipper is sewn to it for fastening with a sleeping bag. This is what the detail looks like.
If you put more layers of filler in it than in the bag itself, then it will serve as a full-fledged pillow and you won’t have to take anything extra with you.
The model can also be upgraded by making a transformer bag and a 2 in 1 blanket out of it. To do this, sew along the edge of the zipper not to the middle of the bag, but along the entire seam with a fold over the seam at the legs. In this case, if you unzip the entire zipper, you can get a full-fledged blanket.
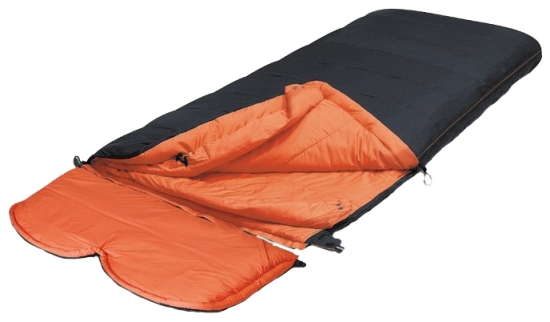
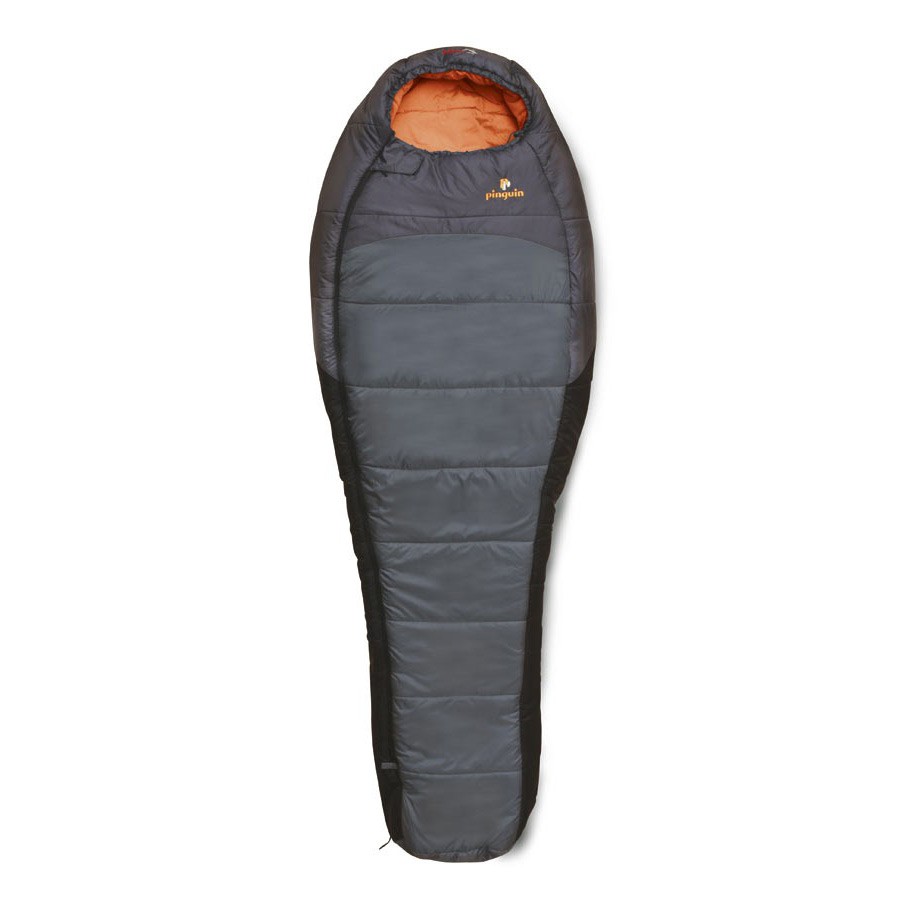
Model "Cocoon"
This version of the sleeping bag differs from the previous one in that its width narrows towards the legs, and the hole for the head is equipped with a tightening elastic band with clamps.
In order to sew such a sleeping bag, you will need the following materials: two types of fabric (the outer fabric is denser, and the inner one is thinner), an elastic band, two clamps and a zipper. With regards to lightning, here the longer it is, the better.
In order to start sewing such a bag, you need to make patterns from the fabric. One piece for each type of fabric.
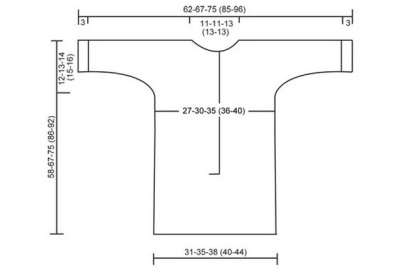
To do this, take a fabric in the shape of a rectangle, where the length will be 230-260 cm and the width 120-150 cm. Fold the rectangle in half lengthwise. Cut out a piece from the folded fabric as shown in the picture below, where left side The pattern will run along the folded edge of the fabric. In the same way, make two parts from a synthetic winterizer.
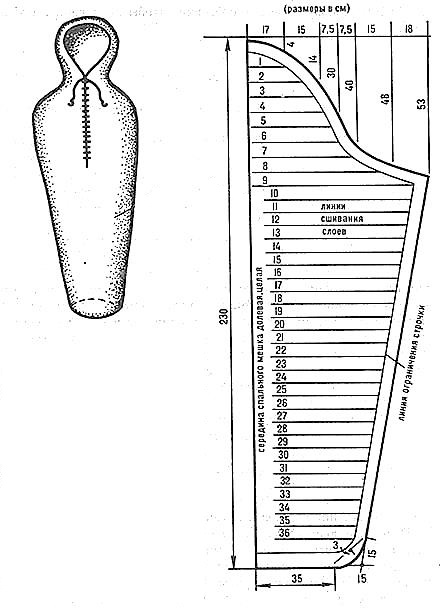
If you want to make the bag warmer, you can lay not two, but three or four layers of filler, depending on what weather conditions you plan to stay in.
Lay the fabrics together on a flat surface in layers. On the bottom layer, put two layers of synthetic winterizer, on top of two layers of fabric folded facing each other. Sew along the perimeter, retreating 1 cm from the edge. When sewing a section for the face, lay a lace or elastic band in such a way that its ends are nested between the fabrics, and the middle lies along the cut rounded edge of the part.
The holes through which the lace will come out of the fabric, do not overfill, otherwise it will be impossible to adjust. Leave a 20 cm segment at the legs not stitched, turn the product out through it. After sew this segment manually in a secret way.
You have an unfolded bag with the ends of the laces (or elastic band) sticking out from the sides. Immediately attach the clamps to the ends, because they can be pulled inside the bag and you will have to try later to remove them.
Fold the bag in half inside out, stitch the zipper in the direction from the shoulders to the legs. The zipper can reach the middle of the bag, or maybe to the very bottom. If the lightning ended in the middle, then on the remaining segment, sew the edges together.
Now, in order to sew the seam in the legs, fold the bag the way it should be only inside out. Sew the bottom edges together. The seam will run perpendicular to the previous one.
Turn the bag right side out. A do-it-yourself sleeping bag in the shape of a cocoon is ready.
When buying raincoat fabric, choose a dense waterproof fabric. Do not save, otherwise the result may upset, but work will go down the drain.
The padding layer at the bottom of the bag, which will be on the ground under your back, should be thicker than at the top of the bag. It is important that lying on the cold ground inside the bag is warm and comfortable. If suddenly you, lying in a bag, feel cold from the ground, this means that it is not suitable for sleeping in nature.
Do not spare materials and money when making a sleeping bag.
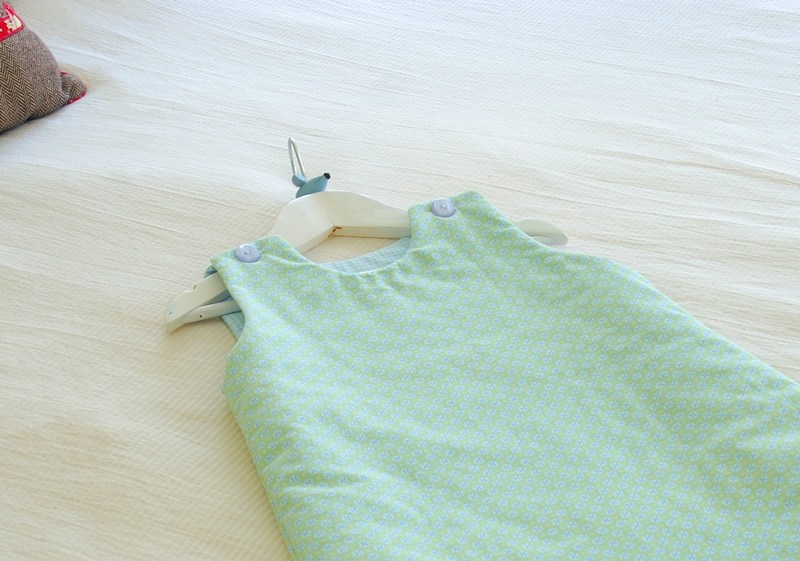
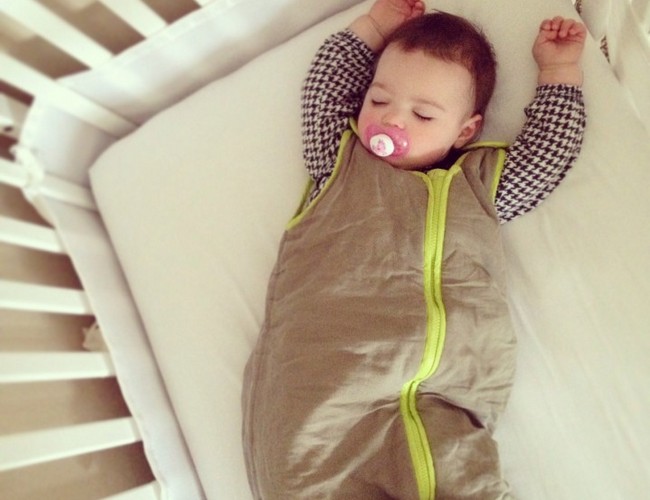
Swaddling is gradually becoming a thing of the past. Now the baby is given the opportunity to freely move arms and legs.
Our waist-length sleeping bag has a wide, soft cuff to keep it from slipping down. But the best part is that even beginners can handle sewing this necessary thing in a dowry for a baby.
You will need
● Outer fabric - natural cotton or jersey 50 cm long, 110 cm wide● Lining fabric - cotton faux fur or thick jersey 50 cm long, 110 cm wide
● Natural fiber rib knit, 25 cm long
cutting
Measure your baby's waist and calculate the length of the bag from chest to legs. Add a large enough length allowance so that the movements of the legs are not constrained. Determine the width of the knitted belt of the sleeping bag, taking into account that the bag does not slip during the movements of the baby, but also does not wrap around his torso too tightly. For a paper pattern, double the width of the strip and allow for seam allowances on all sides.Tip: When cutting, allow for wide seam allowances so that the sleeping bag can be altered to a larger size.
According to the drawing, make a paper pattern of the desired size or draw a pattern on paper and transfer all the marks to it, then cut out the knitted strip without a paper pattern, and make a paper pattern of the original size for the bottom of the bag.
From the top fabric:
● Bag detail 2x
From lining fabric:
● Bag detail 2x
Ribbed jersey:
● 1x folded belt band
Sewing
Step 1: Stitch the details of the bag
Place the outer fabric pieces face to face and stitch from the top edge on one side to the top edge on the other. The top cut remains open. Stitch the lining in the same way, but leave a hole at the bottom of the seam for eversion.Step 2: Sew Belt Details
On the belt, sew the narrow sides face to face in a narrow zigzag or on an overlock. You have a wide ring. Fold this ring in half with the wrong side inward.Step 3: fold all the parts for sewing
Leave the lining of the bag without turning it right side out. Turn the top of the bag right side out. Put the top part inside the lining.Between these two parts of the bag, put a knitted belt, folded in half, so that the open sections are directed outward, see photo.
Make sure that the side seams on the top and lining of the bag, as well as on the knitted belt, match exactly. Pin all the details with pins.
Step 4: Stitch Details
Now stitch all four layers with a zigzag stitch. At the same time, stretch the knitted belt. Finally, turn the bag inside out through the opening at the bottom of the seam on the lining and sew the opening closed by hand with blind stitches.Isn't it not difficult at all?
Surely you want to sew something else for the baby. After all, many little things are not sewn as quickly and simply. But first, carefully read the advice of our experts in
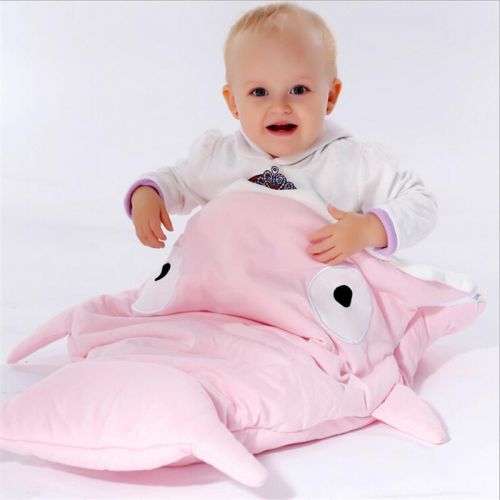
Loving parents, even before the baby is born, begin to think about the conditions for his comfortable sleep and relaxation in the nursery. After buying a quality bed, you should properly organize the bed itself. One of the original and very comfortable accessories for sleeping is a sleeping bag. How to choose a sleeping bag or sew it yourself, tie it and then use it correctly is described in the article.
Benefits of sleeping bags for newborns
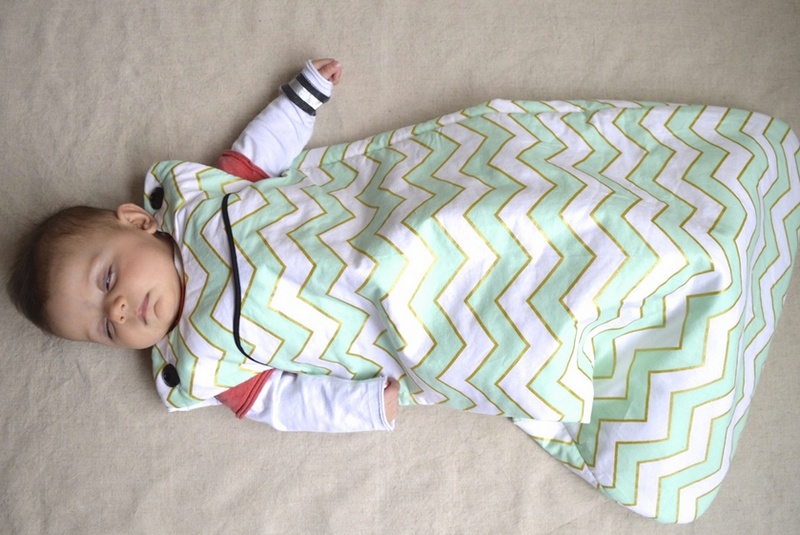
AT recent times many parents prefer not to choose the "classic" - blankets, but sleeping bags for babies. The main advantage of a sleeping bag is the ability to securely cover a child who constantly opens and freezes in a dream. And parents can’t be on duty at the crib with a baby all night to straighten the blanket. The bag is especially suitable for restless babies who prefer to roll from one corner of the crib to another at night, throwing off the blanket, why the child often wakes up and cries. It is for such cases that sleeping bags for newborns were created. Such an accessory will be a real find in winter time or in the off-season, when the heating has not yet been turned on.
Other advantages of a sleeping bag for a child:
- The baby does not open at night. This is a very significant advantage. Especially in winter period sleeping bag for newborns becomes a real godsend for parents.
- The ability to feed a newborn without taking him out of the sleeping bag. If the apartment is cool, the baby may be naughty at the moment of removing him from the heated bed, and a sleeping bag will relieve discomfort.
- Comfort and coziness of sleep - in a sleeping bag you do not need to tuck the edges so that the child is really warm and has a sweet rest. Just now babies born accustomed to the cramped "cradle" of the mother in the womb, so a sleeping bag will come in handy.
- A sleeping bag is safer for newborns than a blanket. The fact is that the child can either pull the blanket over himself, or crawl under the covers himself. The result is the same - the child's head is covered. This can make it difficult to breathe, and the newborn is not able to get out of this position on his own. And when using sleeping bags for newborns, the likelihood of suffocation is much lower.
- A grown up baby sleeping in a sleeping bag will not be able to independently climb over the side of the crib.
- It is very convenient to take with you on a trip or a trip, while you do not need to worry about the hanging edges of the blanket, which is not always hygienic. P At the same time, on any trip, the child will be comfortable to rest in the conditions to which he is accustomed to at home.
Conclusion: a sleeping bag is an important and sometimes indispensable accessory that provides the child with excellent conditions for sleeping.

Are there any downsides to sleeping bags?
- the sleeping bag is not very comfortable for a newborn. This can be especially evident when the child is used to sleeping open, and then suddenly he is placed in an isolated space. However, if the baby sleeps in a sleeping bag from the first days, then such problems, as a rule, do not arise;
- If the sleeping bag is normal, and not with sleeves, then the baby's arms will not be covered and may freeze. In a warm room, this drawback, of course, is not relevant.
- It is advisable to put the child in a sleeping bag in a diaper, which will not allow the child to wet the sleeping bag.
- Changing a diaper at night without waking the baby will be very inconvenient. A sleepy baby needs to be taken out of the bag, undressed, changed the diaper, dressed and put in the bag. After such manipulations, many children wake up completely. Only very young children do not have such a problem, because, as a rule, one diaper is enough for them all night.
How to choose a good sleeping bag?
Even bedding has its own characteristics and features, and sleeping bags also have them. When choosing, you need to consider several indicators, which are described below.
- Sleeping bag size
It is necessary to select a product according to the growth of the child. So, newly born children buy bags 65 cm long, for babies 3-9 months old sleeping bags 70-75 cm are suitable, from 9 months to 1.5 years the size of the sleeping bag should be at least 90 cm. Older children need a sleeping bag of about 100 -110 cm and more.
Sleeping bags are designed for children up to 4 years old! In a large model, there is a risk of confusion. Therefore, a length of 10-15 cm is allowed more than the height of the baby from the neck to the foot. In order not to be mistaken with the size, before buying, measure the circumference of the baby's chest and his height.
To choose a product for a specific height of the baby, it is worth adding 15 cm to the body length from the feet to the neck, so it is recommended to carefully measure your child before buying.
- Compound
As a rule, sleeping bags are made from hypoallergenic, breathable, natural materials. The lining is usually made of 100% cotton, and the upper is made of polyamide fiber, which gives the product shape and retains heat. Caring for such a sleeping bag is as easy as shelling pears - it is washed in a typewriter at a temperature of 40-60 degrees. Products made of artificial or mixed fabrics are not worth buying.
- Are sleeves required?
Typically, sleeves are sewn onto sleeping bags designed for newborns. This will help keep the handles warm and protect the child from accidental injury - scratching the face. If you decide to choose a model with sleeves, then they should not be narrow, because the baby still needs to move. In more expensive sleeping bags, the sleeves even come unfastened, which will be convenient for an older child and in a warm room. There are models in which the length of the sleeves is adjustable.

- Neck of the sleeping bag
The neck should also be spacious so that the child is in no way constrained by the fabric. Ideally, there should be a distance of 1.5-2 cm between its neck and the neck of the sleeping bag.
- Back of the bag
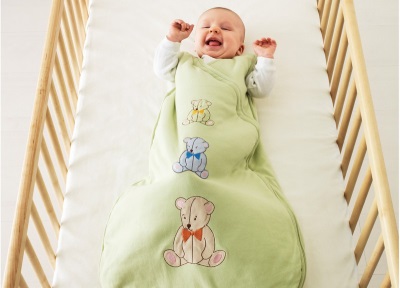
To make it comfortable for a newborn or an older child to sleep, the back of the sleeping bag is chosen smooth, without applications, embroideries, because in otherwise the product will rub delicate skin at night.
- Clasps
In a sleeping bag, as a rule, a zipper is sewn in, which is located right in the center of the product (this makes it easier to change clothes for the baby). For older children who are already actively turning over at night, it is better to buy a sleeping bag with a zipper that unzips from the bottom up - so that it does not diverge on its own or the child cannot unzip it himself. On the back, fasteners are not made so that they do not interfere with children, but on the shoulders, many products have additional buttons - to adjust for growth.
Features of the use of a sleeping bag - season and temperature in the room
There are some recommendations for using sleeping bags:
- Lightweight cotton models are usually used when the apartment is warm - above 22 degrees.
- Insulated products are useful if the temperature drops to 19-22 degrees.
- Warm, quilted sleeping bags are needed if the baby sleeps at temperatures below 19 degrees.
The temperature at which a particular sleeping bag model is used is always indicated on the product label.
What to wear for the night?
In children with normal thermoregulation, it is easy to choose clothes for sleeping. If the thermometer is 22 o C and above, a bodysuit with short sleeves or even one diaper will do. The child is placed in a simple cotton sleeping bag.
If the temperature is between about 20 o C and 22 o C, wear a long-sleeved bodysuit and pajama tops with a cotton sleeping bag or just a bodysuit with an insulated version.
And when the thermometer drops to 18 o C or even 16 o C, which is considered the best microclimate for babies, along with high levels of humidity, they use the most insulated sleeping bag and put on a little man, pajamas with panties or rompers along with a long-sleeve bodysuit . In principle, you will quickly find out what clothes to put on the baby so that he does not freeze, but also does not sweat.
Questions
- Why sew sleeping bags without sleeves, the child will freeze?
In fact, children are very susceptible to overheating. Thermoregulation in infants is still being established, and if the baby is hot, heat transfer occurs, which is just carried out through free handles.
It should be remembered that constant thermal comfort is just as harmful as freezing - the mechanisms of thermoregulation do not “start” properly, and as a result, the child often gets sick with ARVI and acute respiratory infections. If you watch a sleeping baby, you will see that often he sticks his arms out from under the covers, and this is normal.
So do not be afraid to buy sleeveless models when the apartment (house) maintains a more or less stable temperature.
- How to understand that the child is very hot?
Hands are not the most accurate guide, they often feel cold. Touch the tummy or the back of the baby's head, if it is sweaty, hot, then it is hot. Uncover the child, if necessary, change clothes and give a drink.
- How to understand if the temperature in the room is normal?
- What if the child slips into the sleeping bag?
If the size is chosen, taking into account all the nuances and recommendations, this will never happen. The very narrowing in the chest area, as well as cutouts for the arms, serve as an obstacle.
- The bag with "insulation" seems thin. Maybe cover with an extra blanket?
Look not at the thickness of the product, but at the label and the temperature threshold at which it is used. Modern materials perfectly retain heat, despite the fact that they may seem unreliable. As for extra cover, you can't use a duvet with a sleeping bag!
DIY sleeping bag for newborns
Even those mothers who are not too familiar with a sewing machine can sew a sleeping bag for newborns with their own with my own hands. To sew a sleeping bag, you need to buy a good, natural fabric (cotton, wool, knitwear, flannel, etc. It all depends on the temperature in the room and the time the baby is born. If you are sewing a sleeping bag for walking on the street, then you can make a layer of some insulation, for example, synthetic winterizer or holofiber.In any case, you better know what a newborn baby needs), and also choose a pattern of the right size. The order of cutting and sewing is as follows:
- Pattern. You can make a suitable pattern if you use the child's clothes for this purpose. The process is quite simple - you need to take sliders or a T-shirt, mark the outline of the clothes on thick paper, then add a little margin for the seams and room for the body. The resulting bag should not squeeze the child in any way. The length of the sleeping bag, as already noted, is calculated based on the growth of the baby from the neck to the feet plus 15 cm. One piece is cut out for the back, and the front of the bag can be cut both in the form of a one-piece piece and from several parts (make an interesting application).
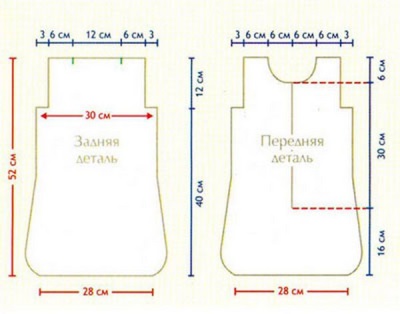
- Open the fabric. To cut the back, you need a single piece of fabric so that the seams do not interfere with the child's sleep. Opening the front of the sleeping bag is best done in two parts to sew in a zipper, but the simplest option would also be a one-piece piece of fabric with a zipper at the bottom.
- Sewing. After the pieces of fabric are cut, they are turned with their faces inward, stitched, and a zipper is sewn in from below (or in the middle). Velcro or buttons can be sewn on the shoulders. For sewing a warm sleeping bag, after cutting the parts, a layer of synthetic winterizer is inserted between each two pairs, and only then the parts are sewn together. You can decorate the sleeping bag in any order - with the help of ribbons, stripes, etc.
Master class: do-it-yourself sleeping bag for a newborn
How to knit a sleeping bag?
For women who knit well, it will certainly not be difficult to make a knitted sleeping bag for a child. Thanks to the repetition of the contours of the body and a pleasant fit, the child will have the most comfortable sleep in such a product. For knitting, you need to purchase wool, or wool mixed with cotton, that is, completely natural materials.
To knit a sleeping bag, a newborn needs about 500 g of wool, buttons, and a zipper. The tool that will be needed is knitting needles 4.5, circular knitting needles 3.5, auxiliary knitting needle. To make an elastic band, alternate the front and back loops. The holes for the buttons are closed in the front row for 2 loops, the same number is recruited from the inside.

The back of the sleeping bag is knitted by casting on 49 loops on the 5th needle, knitting technique - the front surface. In each 2nd row, a loop is added until 59 loops are reached. If the bag is knitted for a newborn, with a length of 48 cm, the loops for the armhole are reduced to 53 loops. After about 15 cm of such a fabric, 11 loops are closed in the middle, the rest are knitted separately. At the same time, the side loops are also closed to form the bevel of the shoulder. The loops should be closed approximately 17 cm from the beginning of the armholes.
The front half of the sleeping bag is made with the front stitch - 69 loops are cast on, side loops are added in each 2nd row when 79 loops are reached. The front of the product can be knitted in any other technique that you like more. After 12 rows, the loops are divided, then they are knitted separately, after 48 cm they make an armhole (similar to how described above).
If the sleeping bag has a hood, sleeves, then they are knitted separately with knitting needles 4 with an elastic band. Next, all parts of the sleeping bag are sewn together, a fastener is sewn in, and if necessary, buttons. After finishing work, the finished product must be washed, after which it can be used for its intended purpose!
All parents want to provide for their newborn baby Better conditions and comfort. Various things help them in this, one of which is a sleeping bag for newborns.
pros
- Using the bag will ensure that the child stays comfortable during sleep. The baby will not open up, and the discarded blanket will not cause the baby to freeze.
- Mom can feed the little one right in the sleeping bag. She does not need to remove the baby from the heated bed, because of which the baby will freeze during the night feeding.
- Inside the sleeping bag, the child is cozy and comfortable, because the child is accustomed to the cramped conditions of being in the mother's womb.
- "Hugging" from all sides, pleasant to the touch fabric gives the baby not only warmth and comfort, but also safety. In a baby sleeping bag, the baby will sleep on his back (this position is considered the best for newborn sleep), and there will be no dangerous objects near the face. Parents may not worry that the baby is tangled in a blanket or has thrown it over his head.
- When the baby grows up a little, sleeping in a sleeping bag will be an obstacle to getting out of the crib.
- It is convenient to take a sleeping bag with you on a long trip. In it, during the trip, the child can sleep in the same conditions to which he is accustomed at home.
 The sleeping bag will create a baby comfortable conditions for sleep and wakefulness
Minuses
- In a sleeping bag, the child should only be put in a waterproof diaper.
- It will not be possible to quickly change a diaper for a baby sleeping in a baby sleeping bag. While the mother checks the condition of the diaper and changes it, the baby can finally wake up and play out.
- Some children do not want to sleep in such a bag, especially if the baby slept immediately after birth in other conditions to which he has already become accustomed.
When buying a sleeping bag for a newborn baby, you should take into account some of the features of such products in order to choose the best model for the baby.
The size
The sleeping bag must be appropriate for the height of the child. Newborns buy products up to 65 cm in size, babies sleep in a 75 cm bag for 4-9 months, for 9-month-old babies and up to 15 months of age a 90 cm model is used, and older babies buy or sew a sleeping bag from 105 cm in size.
Usually, the length of the bag is chosen so that it exceeds the height of the child by 10-15 cm (height from feet to neck is taken into account). So for a successful purchase, be sure to measure the baby.
 Consider your baby's height when choosing a sleeping bag
Compound
Choose a product for your child made of natural, breathable and hypoallergenic material. As a rule, the lining in children's sleeping bags is 100% cotton. Also, the composition is important for the care of the sleeping bag. It is best to buy a bag that is machine washable.
 Choose only natural materials for your baby
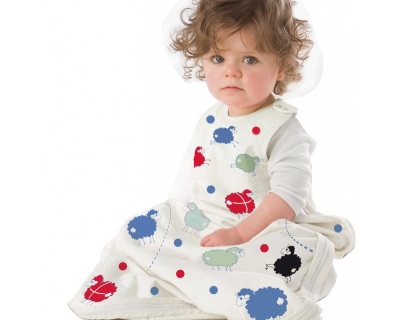
Sleeves
Many sleeping bags for newborns have sleeves, but there are models without sleeves. If the chosen sleeping bag has sleeves, they should be wide enough so as not to interfere with the baby's arms to move. Some bags have sleeves that can be zipped off. There are also products, the length of the sleeves of which is adjustable.
A sleeping bag with sleeves will keep your little one warm on chilly nights.
Neck
It should not squeeze the child's body. Pick up a bag in which the neck fits the baby freely, and the gap between this part and the baby's neck will be about one and a half centimeters.

Back
The bottom of the sleeping bag should be smooth and without any decoration (decorations, patterns) so that the baby does not experience discomfort during sleep.

Clasps
In most sleeping bags for newborns, the zipper is located in the middle so that it is easy for the baby to change clothes. In models for older children, the fastener is sewn in such a way that it is necessary to unfasten the zipper from the bottom up (this will prevent accidental unfastening at night).
In addition, many children's sleeping bags have shoulder studs. In some models, they can change position, adjusting the sleeping bag to the growth of the baby. On the back, as a rule, there are no fasteners.
When should it be used?
The use of a sleeping bag for a newborn baby and older children is affected by the time of year, as well as the room temperature.
If the product is a light cotton sleeping bag, then the baby can sleep in it at room temperature +22°C.
At a lower temperature (from 19 to 22 ° C), the crumbs are placed in an insulated bag model.
There are also products used at room temperatures below +19°C.
The temperature range for the model you purchase should be found on the sleeping bag label.
![]() Sleeping bags are available for both the hot season and the cool season.
Sleeping bags are available for both the hot season and the cool season.
How to sew with your own hands?
To make a homemade sleeping bag for crumbs, you need to choose a suitable pattern and buy high-quality fabric (knitwear, cotton or other natural material).
patterns
by the most in a simple way to build a sleeping bag pattern for a child will use the clothes that the child wears. Paper is applied to a T-shirt or sliders and the contours of the clothes are marked, then a few centimeters are added on each side so that the product does not squeeze the child and there is enough fabric for the seams. The length of the bag is noted depending on the growth of the baby, adding 15-20 cm to the distance from the shoulders to the feet.
For the back, one piece is cut out, and the front of the bag can be cut both in the form of a one-piece piece and from several pieces (to make an interesting appliqué).
Tailoring process
The cut layers of fabric are sewn with the right sides to each other. A zipper is sewn into the lower part of the product, and fasteners on the shoulders can be represented by buttons or Velcro. If the model is warm, a synthetic winterizer is inserted inside. The front part is optionally decorated with ribbons, appliqué and other decorative elements.
To knit a sleeping bag for a baby, get about 500 g of wool and, depending on the design of the product, a few buttons or a zipper. Prepare knitting needles 4 and 5, circular 3.5, and an auxiliary knitting needle for work. For an elastic band, knit alternately the front and back loops, for the holes for the buttons in the front row, close two loops, and in the wrong side, dial the same number of loops.
For the back of the baby bag, cast on 49 sts on needle 5 and work in stockinette st, inc 1 st every other row up to 59 sts. After 48 cm, begin to decrease the loops for the armholes to 53 loops, and after another 16 cm, bind off 11 loops in the middle, and knit the rest separately. At the same time, close the side loops to get the bevels of the shoulder. All loops should be cast off 17 cm from the armhole start line.
For the front, cast on 69 stitches, work in stockinette stitch or in your desired pattern. Add in every second row a side loop up to 79 loops. After 12 rows, divide the loops and knit separately, 48 cm from the first row, make an armhole, as on the back of the product. As on the back, bind off the middle 10 loops, and also bind off the side loops in every second row.
Knit the sleeves and hood with an elastic band with needles 4. Gather the product, sew in a zipper and sew the sleeves and hood to the back and front using circular needles, making 1 hole for a button on each side. Close the loops and sew on the buttons - the knitted sleeping bag is ready.
It's no secret that in the first few weeks after the birth of babies, it is recommended to swaddle. This not only improves their sleep, but also speeds up the process of physical and mental adaptation to the conditions. environment. Recently, outdated diapers are increasingly being replaced with modern and ergonomic sleeping bags. A sleeping bag for a newborn is easy to make with your own hands. Below is a description of the process of making three models of a product from fabric and yarn.
Fabric sleeping bag
If you have at least a little knowledge of the basics of using a sewing machine, sewing a sleeping bag will not be difficult for you. Even a novice needlewoman can make simple model fabric in one evening.
- natural fabric for the front side of the product (cotton, flannel, wool);
- natural fabric for lining (cotton);
- zipper 20-25 cm long;
- tape or trim for processing edges;
- threads;
- tailor's pins;
- scissors;
- sewing machine.
Operating procedure
An approximate pattern of the product is shown in the diagram below. If desired, it can be slightly adjusted. It should be remembered that the length of the sleeping bag should be equal to the length of the child from shoulders to heels, plus 15-20 cm of stock. We put about 1.5 cm allowances on all seams.
We cut out the front and back parts from the front and lining fabric, sweep them or chop them off with pins. If you plan to use a sleeping bag for walking, insert between two layers of fabric thin layer insulation.
We cut the details, folding them with the front sides inward, turn it inside out and iron the product. We process open seams with an inlay or a special tape, sew in a zipper. The fastener can be moved to the bottom of the sleeping bag for convenience. We decorate the product at our discretion with embroidery or appliqué.
Be sure to wash and steam the bag before use. The sleeping bag for the newborn is ready! By increasing the size of the pattern, you can sew a product for an older child.
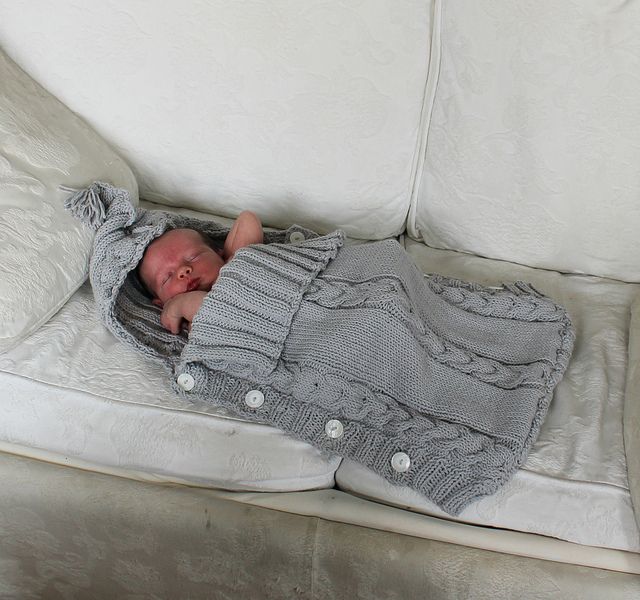
Knitted sleeping bag
A very warm and cozy sleeping bag can be knitted. For its manufacture, you should choose only natural yarn, giving preference to wool, cotton and microfiber. If you tie the envelope with a hood, it can also be used for walking.
Necessary materials and equipment
- fine merino wool yarn;
- straight and circular knitting needles No. 5;
- hook number 4;
- buttons.
Operating procedure
We pre-knit a sample with the front stitch with a thread in two additions to calculate the number of loops and knitting density. Depending on the value obtained, we collect 100-110 loops on circular knitting needles and knit the back along with the shelves in straight and reverse rows. We remove the first edge loop, then we knit with the front stitch (straight rows with front loops, reverse rows with purl loops). The last 15 loops, not counting the hem, we knit with a “pigtail” pattern according to the scheme below.

At a height of about 35 cm, we close several loops for armholes on the sides of the knitted fabric: we knit 29 loops, close 4 loops, knit another 29 loops and again close 4 loops, then we knit according to the pattern. We continue to knit each of the resulting parts separately.
We knit the back with a straight piece until the required height is reached. On the shelves we form a rounded neckline 4-5 cm before reaching the required height of the parts. For sleeves, we collect 36 loops on straight knitting needles, close knitting in a ring and knit the first 5 cm with a “pigtail” pattern. Then we pass to the front surface, evenly reducing 6 loops. In each 4 rows, we add 1 loop to form smooth bevels of the sleeve, until 48 loops are obtained on the knitting needles. To knit the sleeves, we decrease 4 loops on each side and in the next row we close all the loops.
We carry out shoulder seams and we collect 63 loops around the perimeter of the neck, in the next row we evenly add 10 loops. We knit with front stitch. At a height of about 15 cm, we divide the knitted fabric in half and begin to close 2 loops on each side, forming a hood. At the end, we break and thread the thread.
We carry out all other seams. On one of the shelves we crochet the desired number of hinged loops, on the other we sew buttons in the appropriate places. The sleeping bag is ready.
Crochet sleeping bag
An easy-to-make sleeping bag can be crocheted. The model shown in the photo below can be used as a statement envelope.

Necessary materials and equipment
- pink or blue cotton yarn;
- hook number 4;
- zipper length 30-35 cm.
Operating procedure
We are building a scheme for the future sleeping bag. You can use the sewing pattern above or any other. We transfer the pattern to paper and cut it out for convenience.
In strict accordance with the obtained dimensions, we knit the front and back of any pattern you like. In our case, an openwork "shell" pattern is used, made with simple and embossed columns with two crochets.

We sew the details with a needle or crochet, sew in a zipper, thread all the threads. For this openwork model, it is recommended to sew a separate fleece lining. At the end, decorate the sleeping bag to your liking and wash it before use.
Video on the topic of the article
In the video tutorials below, you can learn how to make other models of sleeping bags and envelopes for newborns.


